
Seungmin Kim([email protected])
0. Overview
Up to the previous class, we used Remix IDE in an Ethereum testnet environment to deploy smart contracts and interact with them directly by calling their functions.
In this session, we will go one step further and explore how these smart contracts are used when connected to a web interface, that is, in the form of a dApp (Decentralized Application).
In other words, while the previous session focused on the smart contract itself, this session focuses on how that smart contract is actually used within a real application.
Accordingly, the main objectives of this practice are as follows:
to experience how the blockchain manages the core rules and state of an application.
to learn how users interact with a dApp through their wallets,
to understand how smart contracts are connected to web applications,
1. dApp
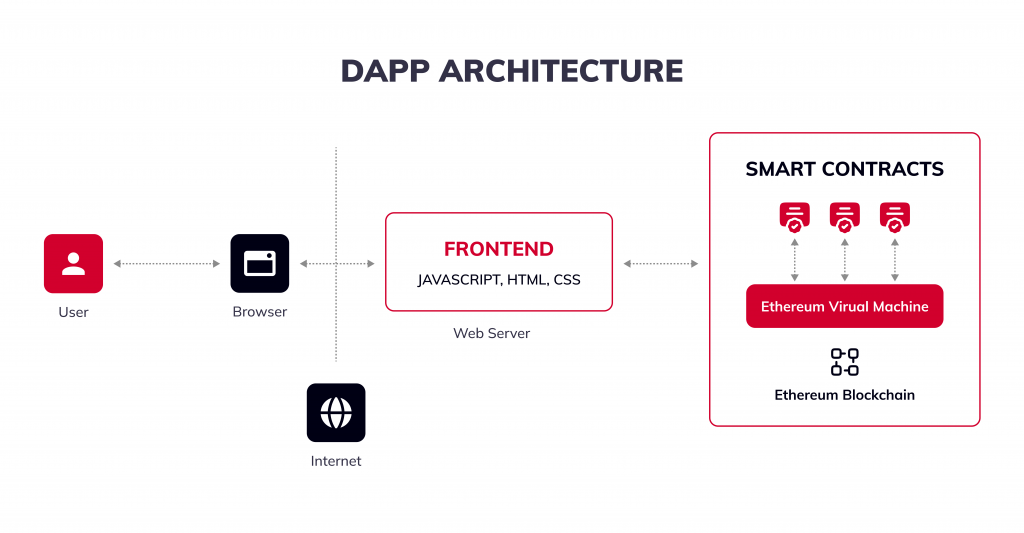
What is a dApp?
A dApp (Decentralized Application) is an application whose core functionality operates through smart contracts on a blockchain, rather than through a centralized server.
In a typical web service, a server processes user requests and a database stores information.
In contrast, in a dApp, the important rules and states are recorded in smart contracts and on the blockchain, and users interact with the application directly through a wallet.
In this sense, a dApp can be understood as a combination of the following two components:
- Smart contract: the backend that handles the core logic and state
- Frontend UI: the interface through which users interact on the web
The frontend can be built just like a normal website using HTML, CSS, and JavaScript, and in some cases it can also be hosted on decentralized storage systems such as IPFS.
Difference Between a Traditional Web Service and a dApp
| Item | Traditional Web Service | dApp |
|---|---|---|
| Core logic | Runs on a centralized server | Runs in smart contracts |
| Data storage | Centralized database | Blockchain state |
| User authentication / access | ID and password | Wallet-based |
| Trust model | Users must trust the service operator | Users trust the deployed contract and the blockchain |
| Point of failure | Service may stop if the server or database fails | Core logic does not depend on a specific centralized server |
| Transparency | Internal logic may not be visible | Contract code and state can be publicly inspected |
Why is a dApp possible?
A blockchain is not simply a system for sending coins.
It is also a platform that can execute rules in code through smart contracts.
In Ethereum, once a smart contract is deployed to the blockchain, network participants execute that code according to the same rules.
As a result, the core functions of an application can operate without relying on a specific company’s server.
For example, in a game dApp, the blockchain can directly handle important functions such as:
- player registration,
- submission and locking of choices,
- result determination,
- reward distribution.
In other words, the web page may only provide the interface, while the smart contract manages the actual rules and state of the application.
Relationship Between Smart Contracts and dApps
To understand a dApp, it is first necessary to understand a smart contract.
A smart contract is a program deployed on the Ethereum blockchain that executes automatically according to predefined rules.
Because a deployed contract cannot be easily changed, sufficient testing and review are necessary before deployment.
Therefore, a dApp can be simply understood as:
an application that uses a smart contract as its backend and a web UI as its frontend.
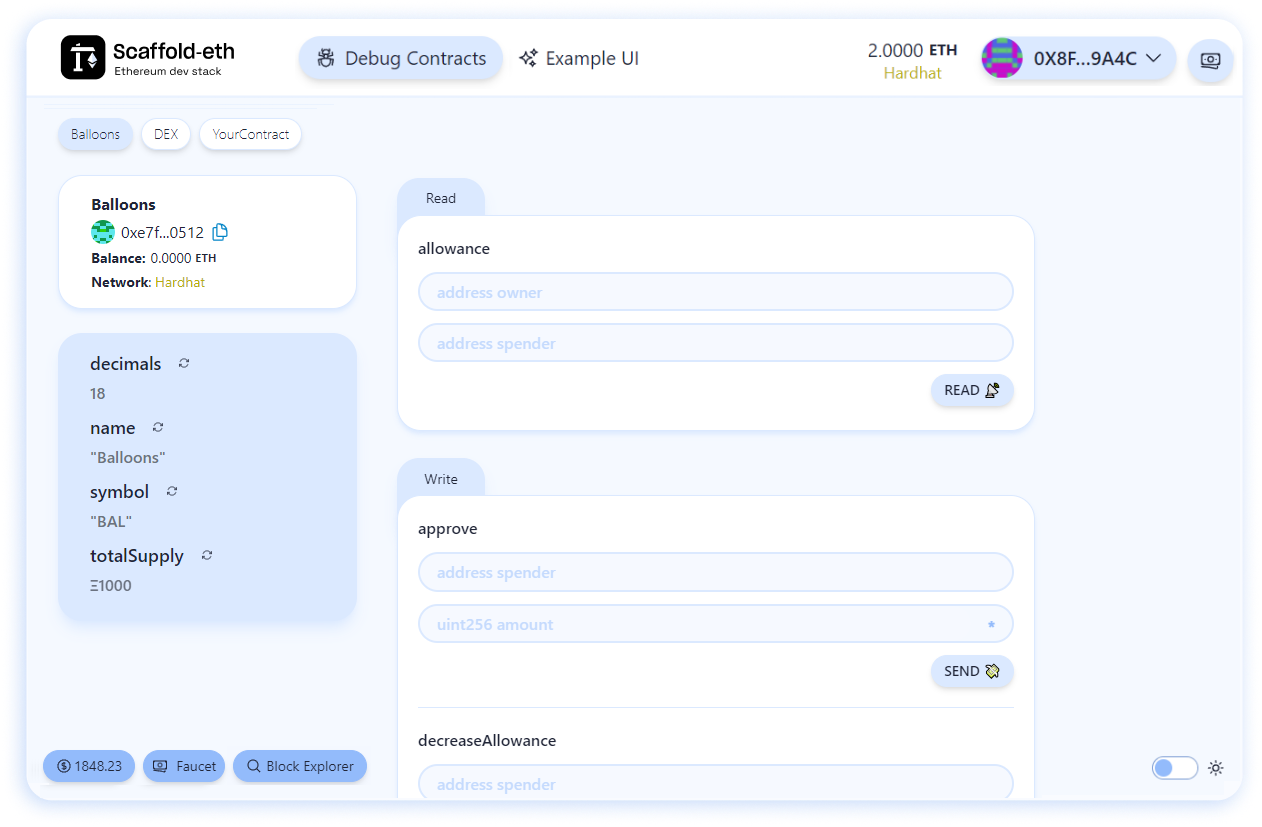
2. Installing the Scaffold-ETH 2 Environment
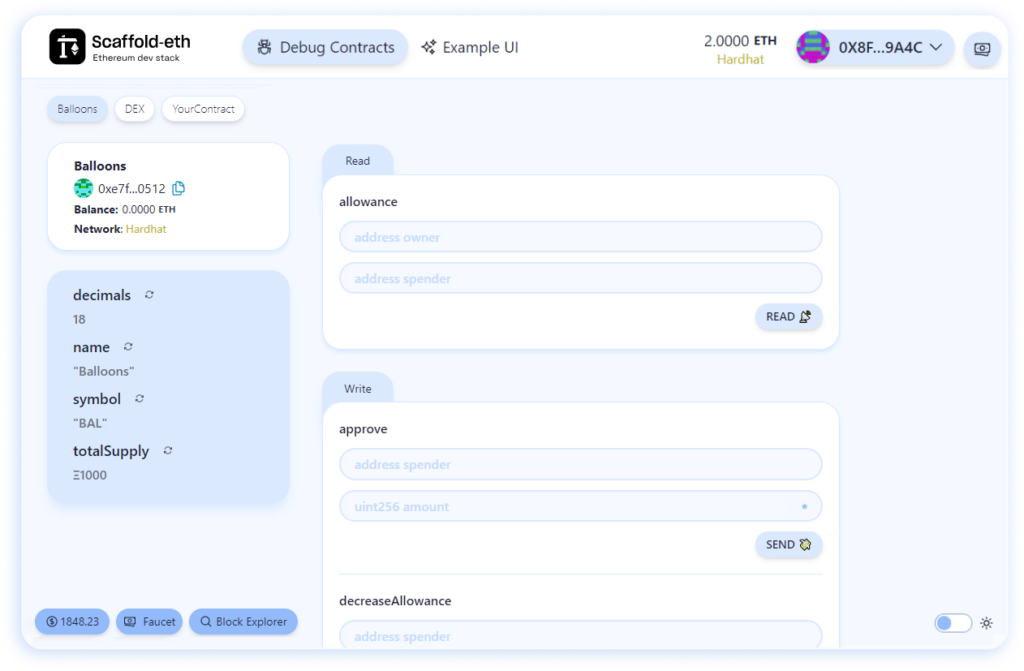
Scaffold-ETH 2 is an open-source development toolkit that helps users quickly build and practice Ethereum-based dApp development.
It is designed to make it easy to handle smart contract writing and deployment, frontend integration, and wallet connection in one environment.
In other words, it can be seen as a suitable practice environment for developing both smart contracts and web interfaces together.
Main Features
Local testing environment
It provides a local network where users can deploy and test smart contracts while practicing the overall dApp development workflow.
Fast integration between smart contracts and the frontend
When a contract is modified, the changes can be easily reflected in the frontend during development.
Wallet connection support
It supports connection with wallets such as MetaMask, allowing users to interact with the blockchain.
Preparation Before Practice
Before using Scaffold-ETH 2, the following programs should be installed:
- Node.js: v20.18.3 or higher
- Yarn
- Git
- Visual Studio Code (VS Code)
The installation instructions below are based on Windows. Node.js, Git, and VS Code all provide official installers, and VS Code supports Windows, macOS, and Linux. Git also provides installation paths for each operating system.
Installing Node.js
https://nodejs.org/en/download
Install version 20.x LTS or later from the official Node.js website.
After installation, open a new terminal and check it with the following commands. The Node 20 series is still provided as an official release line.
Copied!node -v
npm -v
If the version numbers are displayed correctly, the installation is complete.
Installing Yarn
The latest Yarn documentation recommends using Corepack rather than npm install -g yarn.
Corepack is included with Node.js, and the Yarn binary can be enabled with the corepack enable command.
Run the following commands in the terminal:
Copied!corepack enable
yarn -v
Installing Git
Download and install Git from the official website:
On Windows, you can use the Git for Windows installer.
The official installation page provides the latest installer for Windows.
After installation, check it in the terminal with:
Copied!git --version
Installing Visual Studio Code
From the official VS Code download page, install either the Windows User Installer or the System Installer.
After installation, open VS Code, load the practice folder, and check in the integrated terminal that Node, Yarn, and Git are working properly.
https://code.visualstudio.com/Download
Checking the Installation
After completing all installations, the setup is ready if the following commands run successfully in the terminal:
Copied!node -v npm -v yarn -v git --version
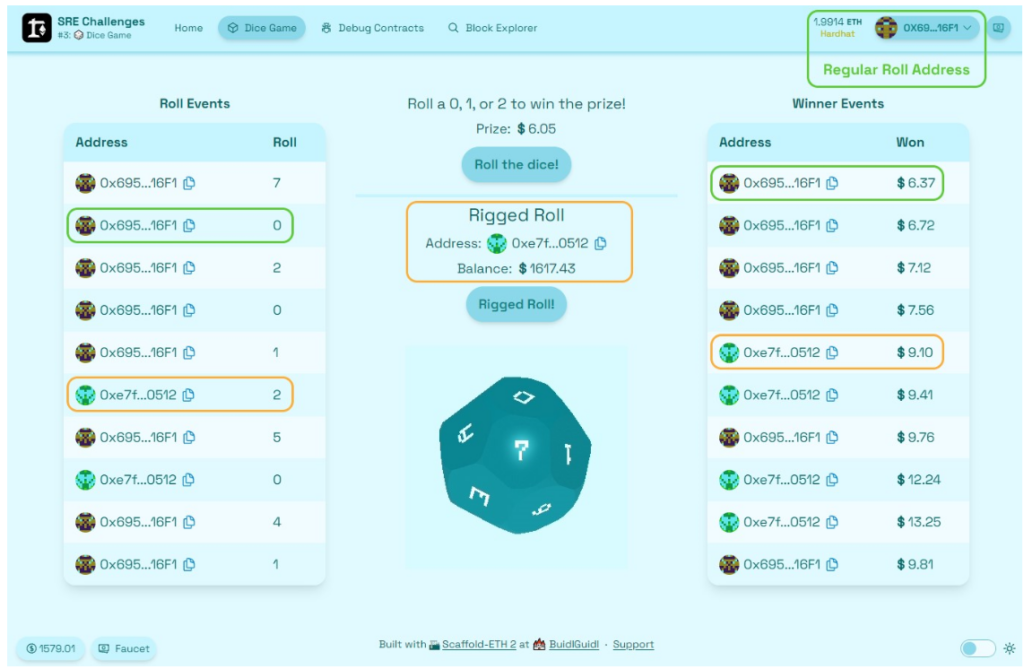
3. 🎲 Dice Game dApp

https://github.com/scaffold-eth/se-2-challenges/tree/challenge-dice-game
This example is a hands-on exercise using the Dice Game from Scaffold-ETH 2 to explore how a smart contract-based game dApp works.
In this game, the user can roll a dice by paying a certain amount of Ether.
Depending on the result of the roll, the user may receive a prize or may receive nothing.
Although it looks like a simple game on the surface, this example helps illustrate why handling randomness in a blockchain environment is difficult.
Key Concept
The important point in this example is that it is difficult to implement secure randomness in a blockchain that is public and deterministic.
Because smart contracts must allow all participants to verify the same result, it is not easy to generate random numbers that are completely secret and unpredictable.
For example, generating randomness using a block hash is simple to implement, but it may not be secure.
For this reason, more secure methods such as the following are used in practice:
- Commit-Reveal method: First, the user submits a hidden value as a commitment, and later reveals the actual value. This helps prevent participants from manipulating the result in advance or checking it immediately, making it safer than using a simple public input for randomness.
- Oracle-based method: An external service outside the blockchain provides random numbers or other data. This makes it possible to bring in information that is difficult to generate using smart contracts alone, but the trustworthiness of the oracle becomes very important.
- Verifiable Randomness methods such as Chainlink VRF: Randomness is provided externally, but along with proof that the random value was generated correctly. In other words, the contract does not simply receive a random number; it can also verify that the value was not manipulated, making the approach more reliable.
How the Game Works
In the Dice Game smart contract, the user pays 0.002 ETH each time they roll the dice.
If the dice result matches a specific value, the player receives the currently configured prize.
The initial prize is set to 10% of the contract balance,
and the initial contract balance is 0.05 ETH.
In addition, the amount sent by the player when rolling the dice is used as follows:
- part of it is added to the current prize, and
- the rest remains in the contract balance for future prize payouts.
How to Run It
First, download the challenge files and create the project.
Copied!npx [email protected] -e challenge-dice-game challenge-dice-game
cd challenge-dice-game
Next, start the local blockchain network in the first terminal.
Copied!yarn chain
In the second terminal, deploy the smart contract to the local network.
Copied!cd challenge-dice-game
yarn deploy
If you modify the smart contract and need to deploy it again, you can use the following command:
Copied!yarn deploy --reset
This command is used to redeploy a new contract and update the frontend to reflect the new contract address.
4. Analyzing the Dice Game
In this exercise, we will not directly modify the DiceGame.sol contract.
Instead, we will focus on understanding how the game works and analyzing whether its method of generating randomness is secure.
First, open the DiceGame.sol file in the packages/hardhat/contracts folder and examine how the smart contract operates.
The key point of this challenge is not to change the contract code itself, but to understand how the dice value is generated and to consider whether the result can be predicted in advance.
What to Try During the Exercise
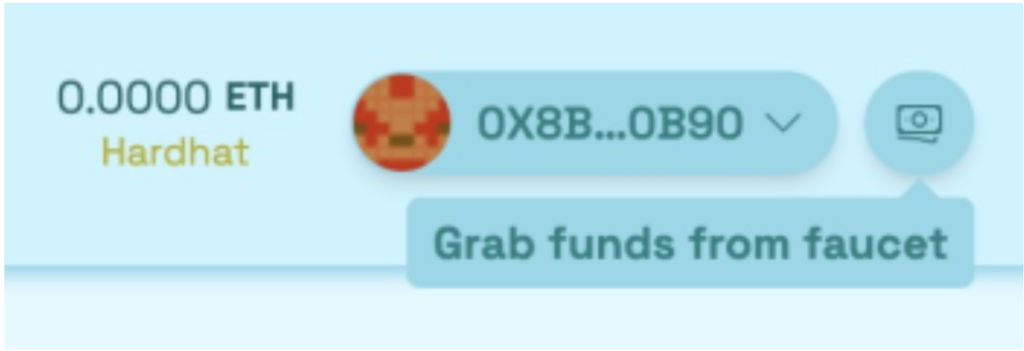
- Get practice ETH from the faucet
- Play the dice game a few times
- Check how the DiceGame contract balance changes in the Debug tab
As you play the game, you can observe the following:
- If the dice roll succeeds, the contract balance decreases because the prize is paid out.
- If the dice roll fails, the contract balance increases because the ETH sent by the player remains in the contract.
How Does DiceGame Generate Randomness?
In DiceGame.sol, the dice value is calculated roughly as follows:
Copied!bytes32 prevHash = blockhash(block.number - 1);
bytes32 hash = keccak256(abi.encodePacked(prevHash, address(this), nonce));
uint256 roll = uint256(hash) % 16;
In other words, DiceGame combines the following three values to create a hash:
- the previous block hash,
blockhash(block.number - 1) - the current contract address,
address(this) - the current
nonce
It then computes the result using keccak256, and finally uses the remainder after dividing by 16 as the dice value.
Is This Randomness Secure?
Although this method may look random at first glance, it can actually be predictable.
This is because all of the inputs used in the randomness calculation are either public or observable.
- The previous block hash is already public information once the block has been mined.
- The DiceGame contract address is also public.
- The
noncecan also be checked from the contract state.
This means that if someone can perform the same calculation in advance, they can also calculate what the next dice result will be.
As a result, it becomes possible to call the game function only when the outcome is favorable.
This is one of the classic security problems that arises when randomness is implemented in a simple way on a public blockchain.
5. Writing the RiggedRoll Contract
Now we write an attack contract, RiggedRoll.sol, that predicts the dice result in advance and only calls the game when it will win.
The core idea is simple:
- Reproduce the exact same randomness calculation used by
DiceGame - Check in advance whether the next dice result is in the winning range
- Call
rollTheDice()only when the result is favorable
This way, if the outcome is not a winning one, there is no need to play the game, which means no unnecessary ETH is lost.
First Step: Make the Contract Able to Receive ETH
The RiggedRoll contract must first be able to receive funds.
This is because it needs to send 0.002 ETH when it actually calls DiceGame.rollTheDice().
So, RiggedRoll.sol should include the following function to accept normal ETH transfers:
Copied!receive() external payable Array
With this function, ETH can be sent to the RiggedRoll contract address from the Faucet or from another account.
Adding Custom Errors
In this exercise, we use custom errors to clearly distinguish between two failure cases.
Copied!error NotEnoughETH(uint256 required, uint256 available);
error NotWinningRoll(uint256 roll);
The meaning of each error is as follows:
NotEnoughETH
The contract balance is less than 0.002 ETH, so the game cannot be executed.
NotWinningRoll
The predicted result is not a winning number, so the contract should not roll the dice this time.
This makes the reason for failure much clearer.
Core Logic of the riggedRoll() Function
The riggedRoll() function must calculate the dice result in exactly the same way as DiceGame.
The required steps are as follows:
- Check whether the current balance of the
RiggedRollcontract is at least 0.002 ETH - Read the current
noncefromDiceGame - Get the previous block hash using
blockhash(block.number - 1) - Compute the hash in the same way as
DiceGame - Compute
roll = uint256(hash) % 16 - Call
rollTheDice()only if the result is in the winning range
An example implementation is shown below:
Copied!function riggedRoll() external {
uint256 required = 0.002 ether;
uint256 available = address(this).balance;
if (available < required) revert NotEnoughETH(required, available); bytes32 prevHash = blockhash(block.number - 1);
uint256 nonce = diceGame.nonce();
bytes32 hash = keccak256(abi.encodePacked(prevHash, address(diceGame), nonce));
uint256 roll = uint256(hash) % 16; if (roll > 5) revert NotWinningRoll(roll); diceGame.rollTheDice{value: required}();
}
What Does This Function Actually Do?
riggedRoll() is not a function that always rolls the dice.
More precisely, it is a function that calls rollTheDice() only when the calculation shows that the next roll will win.
In other words:
- If the predicted number is not a winning one, it stops with
NotWinningRoll - If the contract does not have enough ETH, it stops with
NotEnoughETH - Only when both conditions are satisfied does it call
rollTheDice()
Because of this structure, the attacker does not participate in the game under unfavorable conditions and only plays when the odds are favorable.
Why Is This Possible?
This attack is possible because the randomness used by DiceGame does not depend on any secret information.
All of the values used in the calculation are knowable:
- the previous block hash
- the
DiceGamecontract address - the current
nonce
Therefore, if RiggedRoll performs the exact same calculation, it can predict in advance what the next dice value will be.
Deployment and Execution
To deploy the RiggedRoll contract, uncomment the relevant lines in the deployment script and run the following command:
Copied!yarn deploy --reset
After deployment, ETH must be sent to the RiggedRoll contract before making the first roll.
This is necessary because rollTheDice() must be called together with 0.002 ETH.
After that, you can execute the riggedRoll() method from the Debug Contracts tab.
To verify that the implementation is correct, run the following test:
Copied!yarn test --grep "Checkpoint2"
This test checks whether the logic of RiggedRoll has been implemented correctly.
참고
To deploy the RiggedRoll contract, you need to uncomment the relevant section in the filepackages/hardhat/deploy/01_deploy_riggedRoll.ts.
In other words, the deployment script should look like the following:
Copied!await deploy("RiggedRoll", {
from: deployer,
log: true,
args: [diceGameAddress],
autoMine: true,
});const riggedRoll: RiggedRoll = await ethers.getContract("RiggedRoll", deployer);try {
await riggedRoll.transferOwnership(
"0x104AAE941ed53721aadb7dF64b2068FC1F17666E",
{ gasLimit: 100000 }
);
} catch (err) {
console.log(err);
}
Here, the address"0x104AAE941ed53721aadb7dF64b2068FC1F17666E"
is only an example, so it must be replaced with your own address.
Also, if a gas-related error occurs during deployment or contract interaction, you can try again by explicitly setting a gasLimit value as shown above.
Copied!hardhat: {
gas: "auto",
blockGasLimit: 1000000,
forking: {
url: `https://eth-mainnet.alchemyapi.io/v2/${providerApiKey}`,
enabled: process.env.MAINNET_FORKING_ENABLED === "true",
},
},
6. Adding a Prize Withdrawal Function
If you successfully used the RiggedRoll contract in the previous step to win the game, one issue still remains.
Because the caller of rollTheDice() is not the user directly but the RiggedRoll contract, the prize won from the game does not go straight to the user’s wallet.
Instead, it accumulates in the balance of the RiggedRoll contract.
Therefore, in this step, we add a withdraw() function that allows the ETH stored in the RiggedRoll contract to be withdrawn to a user address.
Adding a Custom Error
First, add a custom error to handle the case where the contract does not have enough balance.
Copied!error InsufficientBalance(uint256 requested, uint256 available);
This error is used when the requested withdrawal amount is greater than the current contract balance.
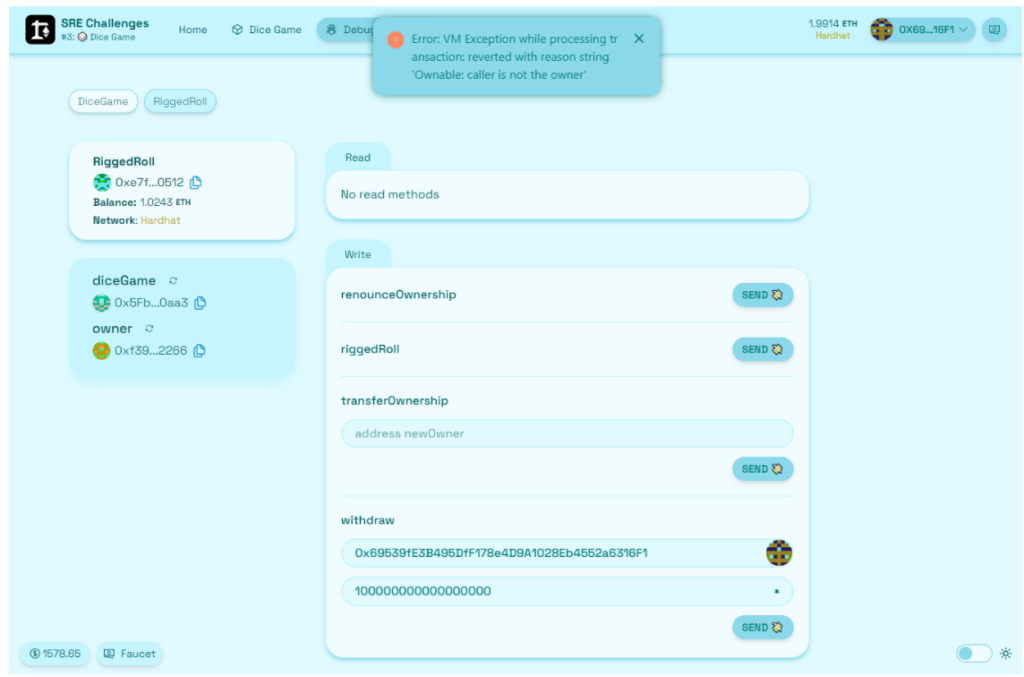
Implementing the withdraw() Function
Now add a withdrawal function to RiggedRoll.sol that can send ETH to another address.
Copied!function withdraw(address _addr, uint256 _amount) external onlyOwner {
uint256 available = address(this).balance;
if (_amount > available) revert InsufficientBalance(_amount, available); (bool success, ) = payable(_addr).call{value: _amount}("");
require(success, "Withdraw failed");
}
This function works as follows:
- It checks the current balance of the contract.
- If the requested amount is greater than the available balance, it reverts with
InsufficientBalance. - If there is no problem, it sends
_amountETH to_addr.
Why Is onlyOwner Necessary?
The withdrawal function is a very sensitive function, so it must not be callable by just anyone.
Since RiggedRoll already inherits from Ownable, we add onlyOwner to withdraw() so that only the owner can withdraw funds.
In other words, this function answers the following questions as follows:
Can anyone withdraw the funds?
No. Because of onlyOwner, only the owner can do so.
Why is this necessary?
Because otherwise, any user could arbitrarily take the prize money stored in the contract.
출금 기능이 올바르게 구현되었는지 확인하려면 다음 명령을 실행한다.
Copied!yarn test --grep "Checkpoint3"
테스트 결과를 통해 withdraw() 로직이 제대로 동작하는지 확인할 수 있다.
7. Connecting the Contracts and Frontend to a Testnet
In the previous steps, we ran and tested DiceGame and RiggedRoll in a local environment.
Now, we deploy them to a public testnet and check whether they work like a real dApp using an actual wallet and network.
In this step, we will mainly do two things:
- deploy the smart contracts to a testnet using a MetaMask account,
- configure the frontend so that it points to the same testnet.
Preparing a Deployment Account
First, you need to prepare an account for deployment.
In Scaffold-ETH 2, you can either create a local deployer account or import the private key of your MetaMask account.
Importing a MetaMask Account
Run the following command in the Scaffold-ETH 2 project:
Copied!yarn account:import
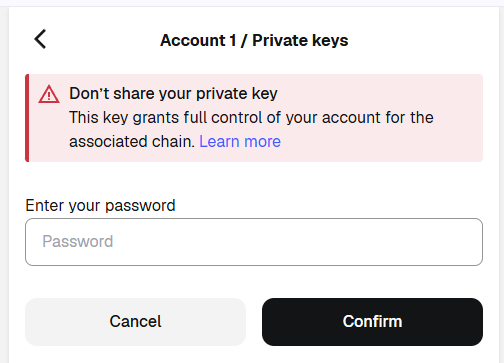
Then paste the private key of your MetaMask account and set a password.
After that, use the following command to check the current deployer address:
Copied!yarn account
Make sure that the printed address matches your MetaMask address.
For this exercise, it is strongly recommended to use only a test account and not the private key of a personal wallet that holds real assets.
Reducing the Initial Funding of DiceGame
In a local environment, DiceGame may start with a slightly larger amount, but on a public testnet it is better to use a smaller initial balance for lower deployment cost and easier practice.
For example, in the deployment script atchallenge-dice-game\packages\hardhat\deploy\00_deploy_diceGame.ts,
you can configure the deployment as follows:
Copied!await deploy("DiceGame", {
from: deployer,
value: String(ethers.parseEther("0.005")),
log: true,
});
In other words, on a testnet, it is better not to set the initial contract funding too high and instead start with a small amount.
Deploying the Contracts to the Testnet
In this exercise, we use Sepolia as the testnet.
First, make sure the project settings point to Sepolia.
For example, in packages/nextjs/scaffold.config.ts, set the target network to Sepolia:
Copied!targetNetwork: chains.sepolia,
After completing the configuration, deploy the contracts with the following command:
Copied!yarn deploy --network sepolia
Then start the frontend:
Copied!yarn start
Open the following address in your browser to access the dApp:
Copied!http://localhost:3000
Check that the network shown on the page is Sepolia, and make sure that MetaMask is also connected to the Sepolia network. Then confirm that the frontend works properly.
Finally, share your deployed contract address in the following spreadsheet:
8. DEX
What is a Decentralized Exchange (DEX)?
A decentralized exchange (DEX) is a system that allows users to directly exchange cryptocurrencies using their own wallets, without a central operating authority.
In a centralized exchange (CEX), the exchange company operates the server, manages users’ orders, and in many cases also holds users’ assets within exchange accounts.
In contrast, in a DEX, smart contracts execute the trading rules, and users connect their own wallets directly to make transactions.
In this sense, a DEX is a representative example that demonstrates the core characteristics of blockchain: decentralization, transparency, and self-custody of assets.
Representative examples of DEXs include Uniswap and Sushiswap, and these services play an important role in the Ethereum-based DeFi (Decentralized Finance) ecosystem.
How is it different from a Centralized Exchange (CEX)?
The biggest difference is who manages the assets and the transactions.
In a CEX, the exchange manages the orders and acts as the intermediary for trades.
In a DEX, users connect their wallets directly and execute trades by interacting with smart contracts.
In other words:
- CEX = “a trading system operated by an exchange company”
- DEX = “a trading system operated by smart contracts”
That is a simple way to understand the distinction.
How does a DEX work?
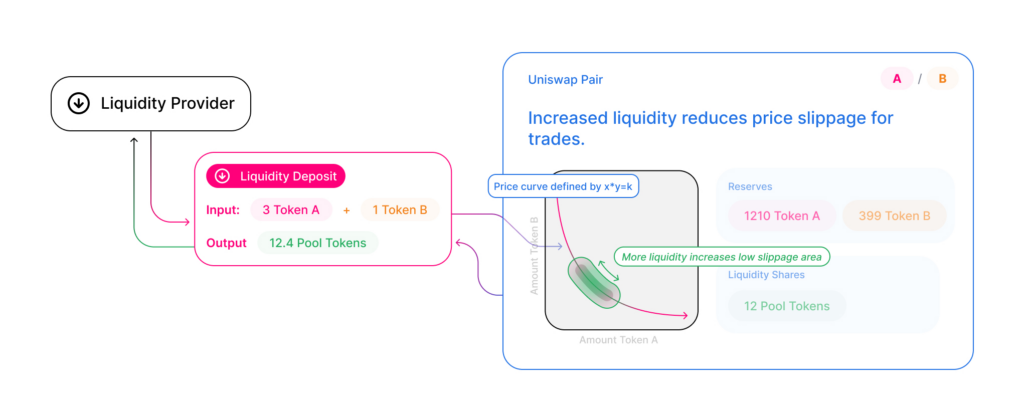
A DEX usually operates based on liquidity pools and smart contracts.
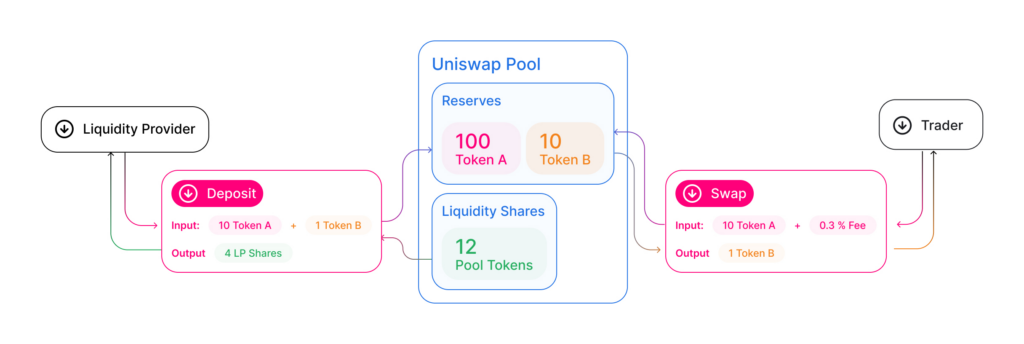
A liquidity pool is a pool of funds containing two different types of assets.
For example, if there is a pool containing ETH and BAL tokens, users can:
- deposit ETH and receive BAL, or
- deposit BAL and receive ETH.
The important point is that the price is not determined manually by a person, but is automatically calculated by a formula implemented inside the smart contract.
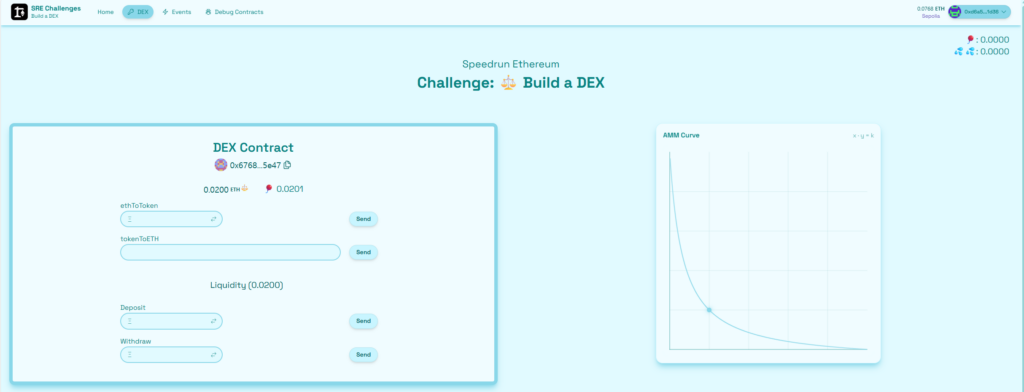
The Scaffold-ETH DEX challenge that we will look at this time is a simplified example of this structure.
In other words, it is a good practice project for learning the core ideas behind a real DEX.
Core Principle of DEX: AMM
Many DEXs operate using an AMM (Automated Market Maker) model.
Traditional exchanges use an order book.
In other words, trades happen by matching the orders of people who want to buy with those of people who want to sell.
However, in the AMM model, there is no order book.
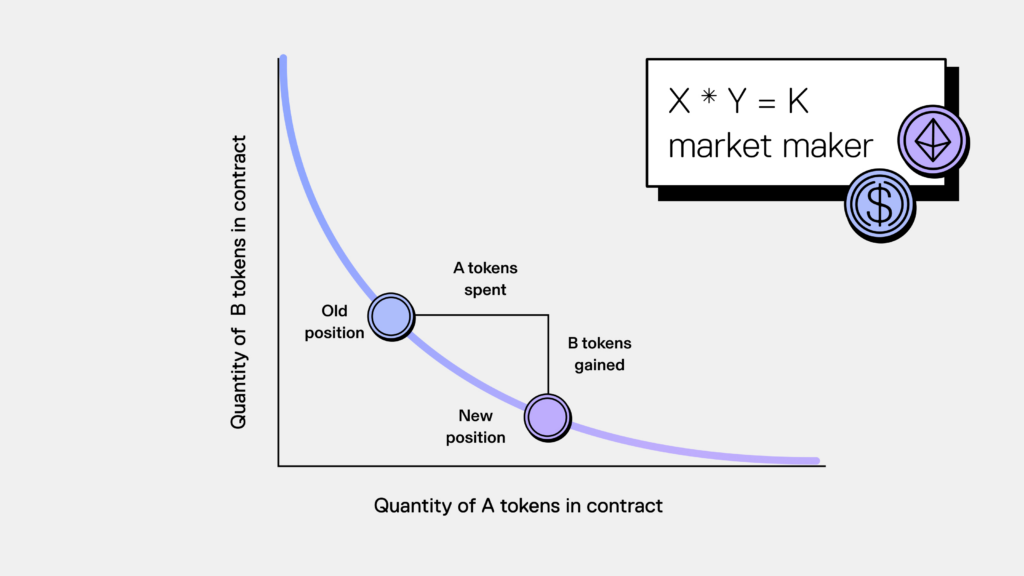
Instead, the price changes automatically based on the amounts of the two assets in the pool.
A representative formula is:
Copied!x * y = k
Copied!(amount of ETH in DEX ) * ( amount of tokens in DEX ) = k
Where:
- x: the amount of ETH in the pool
- y: the amount of tokens in the pool
- k: a value that is kept constant
This means that when a large amount of one asset is removed from the pool, that asset becomes more scarce, and its price is automatically adjusted upward.
Example
Let us assume that there are 1,000,000 ETH and 1,000,000 tokens in the pool.
If we plug these values into the pricing formula and ask for the price of 1,000 ETH, the result is almost a 1:1 ratio.
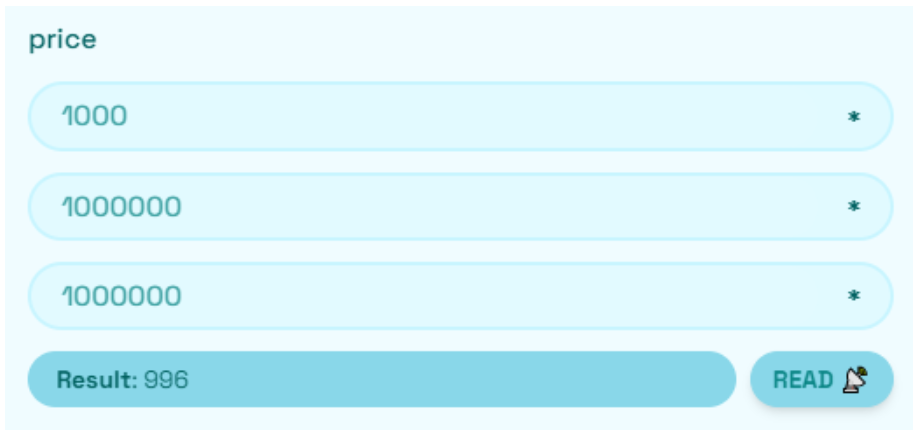
If you swap 1,000 ETH, you would receive about 996 tokens.
If the fee is 0.3%, then under ideal conditions you would expect to receive 997 tokens.
However, because the pool ratio shifts slightly during the trade, a small amount of slippage occurs.
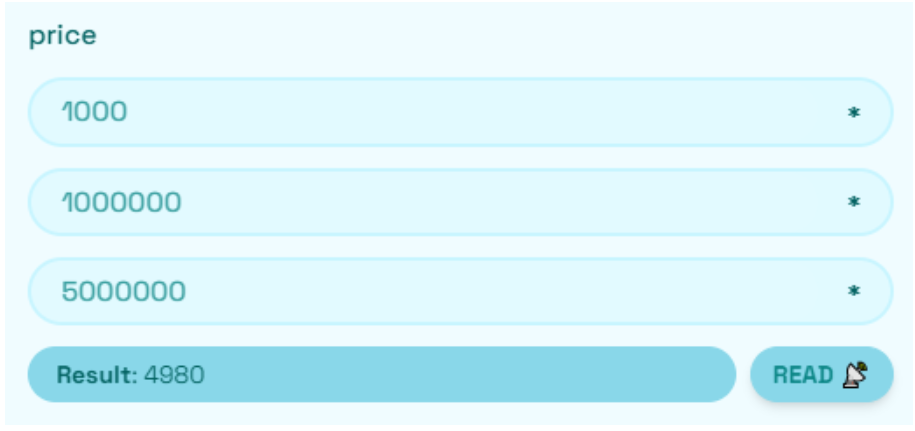
Let us look at another case more closely.
Suppose the pool has 5,000,000 ETH but only 1,000,000 tokens.
Then, if you swap 1,000 tokens, you would receive about 5,000 ETH.
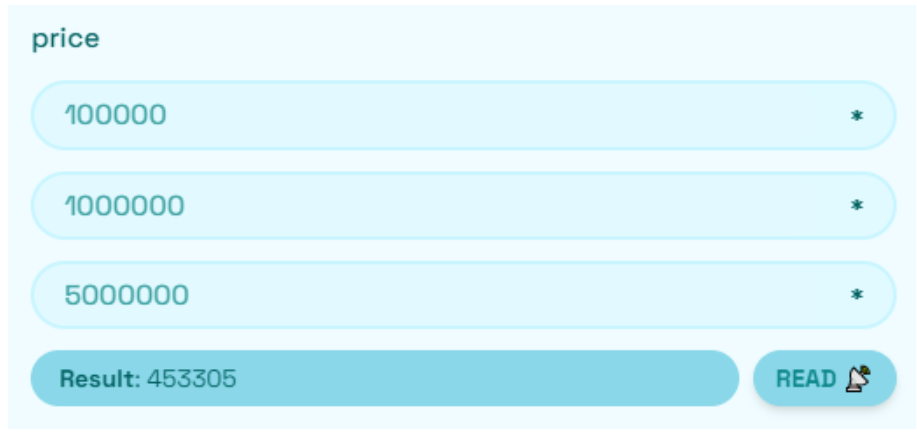
Finally, imagine a case where the ratio is the same, but instead of swapping 1,000 tokens, you swap 100,000 tokens.
In this case, the amount of slippage becomes much larger.
Instead of receiving 498,000 ETH, you would receive only 453,305 ETH, because the trade significantly changes the balance of the pool.
At first, the pool may seem to have an almost 1:1 ratio.
However, if someone deposits ETH and buys a large amount of BAL, the amount of BAL in the pool decreases.
As BAL becomes more scarce, the next person who deposits the same amount of ETH will receive fewer BAL than before.
In other words, the price is not fixed; it changes automatically as trades occur.
What Does “Price” Mean Here?
In this context, price does not simply mean an externally fixed number such as
“1 ETH = some number of BAL.”
Rather, it means:
how much output you receive when you put in a certain amount of input.
So in a DEX, price can be understood as questions like:
If I put in 1,000 BAL, how much ETH will I receive?
If I put in 1,000 ETH, how many BAL will I receive?
Why Do Fees, Slippage, and Liquidity Matter?
A DEX usually charges a trading fee. For example, Uniswap-style systems commonly use a 0.3% fee.
Besides the fee, traders may also experience slippage. Slippage means that the actual amount you receive can be slightly lower than expected because the balance of assets in the pool changes during the trade. For example, even if the formula suggests that swapping 1,000 ETH should return about 997 BAL, the actual result might be closer to 996 BAL.
Slippage becomes larger when the trade size is large, when the pool has low liquidity, or when the two assets in the pool are not well balanced. In general, the larger and more balanced the pool is, the smaller the slippage will be.
This is why liquidity is so important in a DEX. For the exchange to work smoothly, the pool must contain enough assets for users to trade against. These assets are provided by liquidity providers (LPs), who deposit two assets, such as ETH and BAL, into the pool in a certain ratio. In return, they earn a share of the trading fees.
A simple way to understand this is: a trader swaps tokens, while a liquidity provider supplies the assets that make those swaps possible.
For example, in a balanced pool, a small trade can usually be executed with little slippage. However, a very large trade can significantly change the pool balance, leading to a much worse price. This means that even in the same pool, swapping 1,000 tokens and swapping 100,000 tokens can produce very different outcomes. In short, the larger the trade, the greater its impact on the price.
Advantages of DEX
A DEX has the following advantages:
- users can trade directly without an intermediary
- users keep control of their own assets in their own wallets
- the trading process is transparent because it is based on smart contracts
- many DEX projects are open source, so they are good for studying and understanding the structure
- they can be easily connected to a wide variety of tokens and DeFi services
In other words, a DEX can be understood as a way of trading directly on the blockchain while keeping full control over your own assets.
Limitations and Risks of DEX
However, DEXs are not always easy or safe to use.
- They can be difficult to use
For beginners, concepts such as wallet connection, token approval, gas fees, and slippage settings can be complicated.
- Gas fees are required
In Ethereum-based DEXs, users must pay gas fees, which are network fees charged for every transaction.
- Smart contract vulnerabilities may exist
If there is a bug in the code or a flaw in the design, users may suffer asset losses.
- Unverified tokens can be risky
Since anyone can create a token, there is always a risk of fraudulent projects or rug pulls.
- Impermanent loss can occur
Liquidity providers may end up with less value compared to simply holding their assets.
This is a typical risk that occurs when the prices of the two assets in the pool change significantly.
Deeper Understanding: Sandwich Attacks and MEV
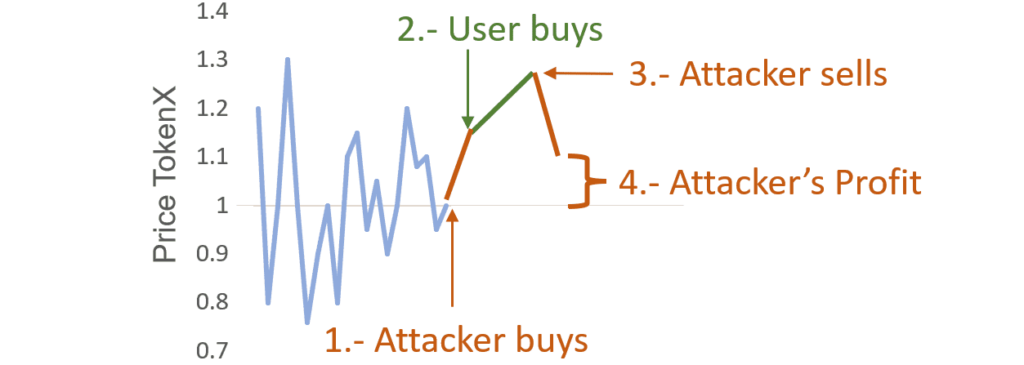
Since DEXs operate on a blockchain, transactions are visible in the mempool for a short time before they are included in a block.
At that moment, a malicious participant can observe your transaction,
place a trade right before yours,
and then place the opposite trade immediately after yours in order to make a profit.
This is called a sandwich attack.
To explain it simply:
- I submit a transaction to buy a token with ETH
- someone else buys the same token first and pushes the price up
- my transaction is executed at a worse price
- that person immediately sells the token back and takes the profit
This is one of the representative examples of MEV (Maximal Extractable Value).
Then How Can This Be Prevented?
The simplest method is to include a condition such as:
“I must receive at least this minimum amount.”
In other words, if the actual outcome becomes much worse than the quoted price, the transaction should fail.
However, if this rule is applied too strictly, the transaction may be canceled entirely when another user’s transaction is executed first in the same block.
That is why real DEXs usually use the following approach:
allow a small amount of slippage, but cancel the transaction if the result becomes too unfavorable.
This is why users are usually asked to set a slippage tolerance.
In the third terminal, run the frontend.
Copied!cd challenge-dice-game
yarn start
After that, open the following address in your browser to view the dApp.
Copied!http://localhost:3000
If you modify the smart contract and need to deploy it again, you can use the following command:
Copied!yarn deploy --reset
This command is used to redeploy a new contract and update the frontend to reflect the new contract address.
4. Analyzing the Dice Game
In this exercise, we will not directly modify the DiceGame.sol contract.
Instead, we will focus on understanding how the game works and analyzing whether its method of generating randomness is secure.
First, open the DiceGame.sol file in the packages/hardhat/contracts folder and examine how the smart contract operates.
The key point of this challenge is not to change the contract code itself, but to understand how the dice value is generated and to consider whether the result can be predicted in advance.
What to Try During the Exercise
- Get practice ETH from the faucet
- Play the dice game a few times
- Check how the DiceGame contract balance changes in the Debug tab
As you play the game, you can observe the following:
- If the dice roll succeeds, the contract balance decreases because the prize is paid out.
- If the dice roll fails, the contract balance increases because the ETH sent by the player remains in the contract.
How Does DiceGame Generate Randomness?
In DiceGame.sol, the dice value is calculated roughly as follows:
Copied!bytes32 prevHash = blockhash(block.number - 1); bytes32 hash = keccak256(abi.encodePacked(prevHash, address(this), nonce)); uint256 roll = uint256(hash) % 16;
In other words, DiceGame combines the following three values to create a hash:
- the previous block hash,
blockhash(block.number - 1) - the current contract address,
address(this) - the current
nonce
It then computes the result using keccak256, and finally uses the remainder after dividing by 16 as the dice value.
Is This Randomness Secure?
Although this method may look random at first glance, it can actually be predictable.
This is because all of the inputs used in the randomness calculation are either public or observable.
- The previous block hash is already public information once the block has been mined.
- The DiceGame contract address is also public.
- The
noncecan also be checked from the contract state.
This means that if someone can perform the same calculation in advance, they can also calculate what the next dice result will be.
As a result, it becomes possible to call the game function only when the outcome is favorable.
This is one of the classic security problems that arises when randomness is implemented in a simple way on a public blockchain.
5. Writing the RiggedRoll Contract
Now we write an attack contract, RiggedRoll.sol, that predicts the dice result in advance and only calls the game when it will win.
The core idea is simple:
- Reproduce the exact same randomness calculation used by
DiceGame - Check in advance whether the next dice result is in the winning range
- Call
rollTheDice()only when the result is favorable
This way, if the outcome is not a winning one, there is no need to play the game, which means no unnecessary ETH is lost.
First Step: Make the Contract Able to Receive ETH
The RiggedRoll contract must first be able to receive funds.
This is because it needs to send 0.002 ETH when it actually calls DiceGame.rollTheDice().
So, RiggedRoll.sol should include the following function to accept normal ETH transfers:
Copied!receive() external payable Array
With this function, ETH can be sent to the RiggedRoll contract address from the Faucet or from another account.
Adding Custom Errors
In this exercise, we use custom errors to clearly distinguish between two failure cases.
Copied!error NotEnoughETH(uint256 required, uint256 available);
error NotWinningRoll(uint256 roll);
The meaning of each error is as follows:
NotEnoughETH
The contract balance is less than 0.002 ETH, so the game cannot be executed.
NotWinningRoll
The predicted result is not a winning number, so the contract should not roll the dice this time.
This makes the reason for failure much clearer.
Core Logic of the riggedRoll() Function
The riggedRoll() function must calculate the dice result in exactly the same way as DiceGame.
The required steps are as follows:
- Check whether the current balance of the
RiggedRollcontract is at least 0.002 ETH - Read the current
noncefromDiceGame - Get the previous block hash using
blockhash(block.number - 1) - Compute the hash in the same way as
DiceGame - Compute
roll = uint256(hash) % 16 - Call
rollTheDice()only if the result is in the winning range
An example implementation is shown below:
Copied!function riggedRoll() external {
uint256 required = 0.002 ether;
uint256 available = address(this).balance;
if (available < required) revert NotEnoughETH(required, available); bytes32 prevHash = blockhash(block.number - 1);
uint256 nonce = diceGame.nonce();
bytes32 hash = keccak256(abi.encodePacked(prevHash, address(diceGame), nonce));
uint256 roll = uint256(hash) % 16; if (roll > 5) revert NotWinningRoll(roll); diceGame.rollTheDice{value: required}();
}
What Does This Function Actually Do?
riggedRoll() is not a function that always rolls the dice.
More precisely, it is a function that calls rollTheDice() only when the calculation shows that the next roll will win.
In other words:
- If the predicted number is not a winning one, it stops with
NotWinningRoll - If the contract does not have enough ETH, it stops with
NotEnoughETH - Only when both conditions are satisfied does it call
rollTheDice()
Because of this structure, the attacker does not participate in the game under unfavorable conditions and only plays when the odds are favorable.
Why Is This Possible?
This attack is possible because the randomness used by DiceGame does not depend on any secret information.
All of the values used in the calculation are knowable:
- the previous block hash
- the
DiceGamecontract address - the current
nonce
Therefore, if RiggedRoll performs the exact same calculation, it can predict in advance what the next dice value will be.
Deployment and Execution
To deploy the RiggedRoll contract, uncomment the relevant lines in the deployment script and run the following command:
Copied!yarn deploy --reset
After deployment, ETH must be sent to the RiggedRoll contract before making the first roll.
This is necessary because rollTheDice() must be called together with 0.002 ETH.
After that, you can execute the riggedRoll() method from the Debug Contracts tab.
To verify that the implementation is correct, run the following test:
Copied!yarn test --grep "Checkpoint2"
This test checks whether the logic of RiggedRoll has been implemented correctly.
참고
To deploy the RiggedRoll contract, you need to uncomment the relevant section in the filepackages/hardhat/deploy/01_deploy_riggedRoll.ts.
In other words, the deployment script should look like the following:
Copied!await deploy("RiggedRoll", {
from: deployer,
log: true,
args: [diceGameAddress],
autoMine: true,
});const riggedRoll: RiggedRoll = await ethers.getContract("RiggedRoll", deployer);try {
await riggedRoll.transferOwnership(
"0x104AAE941ed53721aadb7dF64b2068FC1F17666E",
{ gasLimit: 100000 }
);
} catch (err) {
console.log(err);
}
Here, the address"0x104AAE941ed53721aadb7dF64b2068FC1F17666E"
is only an example, so it must be replaced with your own address.
Also, if a gas-related error occurs during deployment or contract interaction, you can try again by explicitly setting a gasLimit value as shown above.
Copied!hardhat: { gas: "auto", blockGasLimit: 1000000, forking: { url: `https://eth-mainnet.alchemyapi.io/v2/${providerApiKey}`, enabled: process.env.MAINNET_FORKING_ENABLED === "true", }, },
6. Adding a Prize Withdrawal Function
If you successfully used the RiggedRoll contract in the previous step to win the game, one issue still remains.
Because the caller of rollTheDice() is not the user directly but the RiggedRoll contract, the prize won from the game does not go straight to the user’s wallet.
Instead, it accumulates in the balance of the RiggedRoll contract.
Therefore, in this step, we add a withdraw() function that allows the ETH stored in the RiggedRoll contract to be withdrawn to a user address.
Adding a Custom Error
First, add a custom error to handle the case where the contract does not have enough balance.
Copied!error InsufficientBalance(uint256 requested, uint256 available);
This error is used when the requested withdrawal amount is greater than the current contract balance.
Implementing the withdraw() Function
Now add a withdrawal function to RiggedRoll.sol that can send ETH to another address.
Copied!function withdraw(address _addr, uint256 _amount) external onlyOwner {
uint256 available = address(this).balance;
if (_amount > available) revert InsufficientBalance(_amount, available); (bool success, ) = payable(_addr).call{value: _amount}("");
require(success, "Withdraw failed");
}
This function works as follows:
- It checks the current balance of the contract.
- If the requested amount is greater than the available balance, it reverts with
InsufficientBalance. - If there is no problem, it sends
_amountETH to_addr.
Why Is onlyOwner Necessary?
The withdrawal function is a very sensitive function, so it must not be callable by just anyone.
Since RiggedRoll already inherits from Ownable, we add onlyOwner to withdraw() so that only the owner can withdraw funds.
In other words, this function answers the following questions as follows:
Can anyone withdraw the funds?
No. Because of onlyOwner, only the owner can do so.
Why is this necessary?
Because otherwise, any user could arbitrarily take the prize money stored in the contract.
출금 기능이 올바르게 구현되었는지 확인하려면 다음 명령을 실행한다.
Copied!yarn test --grep "Checkpoint3"
테스트 결과를 통해 withdraw() 로직이 제대로 동작하는지 확인할 수 있다.
7. Connecting the Contracts and Frontend to a Testnet
In the previous steps, we ran and tested DiceGame and RiggedRoll in a local environment.
Now, we deploy them to a public testnet and check whether they work like a real dApp using an actual wallet and network.
In this step, we will mainly do two things:
- deploy the smart contracts to a testnet using a MetaMask account,
- configure the frontend so that it points to the same testnet.
Preparing a Deployment Account
First, you need to prepare an account for deployment.
In Scaffold-ETH 2, you can either create a local deployer account or import the private key of your MetaMask account.
Importing a MetaMask Account
Run the following command in the Scaffold-ETH 2 project:
Copied!yarn account:import
Then paste the private key of your MetaMask account and set a password.
After that, use the following command to check the current deployer address:
Copied!yarn account
Make sure that the printed address matches your MetaMask address.
For this exercise, it is strongly recommended to use only a test account and not the private key of a personal wallet that holds real assets.
Reducing the Initial Funding of DiceGame
In a local environment, DiceGame may start with a slightly larger amount, but on a public testnet it is better to use a smaller initial balance for lower deployment cost and easier practice.
For example, in the deployment script atchallenge-dice-game\packages\hardhat\deploy\00_deploy_diceGame.ts,
you can configure the deployment as follows:
Copied!await deploy("DiceGame", {
from: deployer,
value: String(ethers.parseEther("0.005")),
log: true,
});
In other words, on a testnet, it is better not to set the initial contract funding too high and instead start with a small amount.
Deploying the Contracts to the Testnet
In this exercise, we use Sepolia as the testnet.
First, make sure the project settings point to Sepolia.
For example, in packages/nextjs/scaffold.config.ts, set the target network to Sepolia:
Copied!targetNetwork: chains.sepolia,
After completing the configuration, deploy the contracts with the following command:
Copied!yarn deploy --network sepolia
Then start the frontend:
Copied!yarn start
Open the following address in your browser to access the dApp:
Copied!http://localhost:3000
Check that the network shown on the page is Sepolia, and make sure that MetaMask is also connected to the Sepolia network. Then confirm that the frontend works properly.
Finally, share your deployed contract address in the following spreadsheet:
https://docs.google.com/spreadsheets/d/1eeemHdtuIXhlU7gCy443pjE-sNkCufb9PubZs0iMtZA/edit?usp=sharing
8. DEX
What is a Decentralized Exchange (DEX)?
A decentralized exchange (DEX) is a system that allows users to directly exchange cryptocurrencies using their own wallets, without a central operating authority.
In a centralized exchange (CEX), the exchange company operates the server, manages users’ orders, and in many cases also holds users’ assets within exchange accounts.
In contrast, in a DEX, smart contracts execute the trading rules, and users connect their own wallets directly to make transactions.
In this sense, a DEX is a representative example that demonstrates the core characteristics of blockchain: decentralization, transparency, and self-custody of assets.
Representative examples of DEXs include Uniswap and Sushiswap, and these services play an important role in the Ethereum-based DeFi (Decentralized Finance) ecosystem.
How is it different from a Centralized Exchange (CEX)?
The biggest difference is who manages the assets and the transactions.
In a CEX, the exchange manages the orders and acts as the intermediary for trades.
In a DEX, users connect their wallets directly and execute trades by interacting with smart contracts.
In other words:
- CEX = “a trading system operated by an exchange company”
- DEX = “a trading system operated by smart contracts”
That is a simple way to understand the distinction.
How does a DEX work?
A DEX usually operates based on liquidity pools and smart contracts.
A liquidity pool is a pool of funds containing two different types of assets.
For example, if there is a pool containing ETH and BAL tokens, users can:
- deposit ETH and receive BAL, or
- deposit BAL and receive ETH.
The important point is that the price is not determined manually by a person, but is automatically calculated by a formula implemented inside the smart contract.
The Scaffold-ETH DEX challenge that we will look at this time is a simplified example of this structure.
In other words, it is a good practice project for learning the core ideas behind a real DEX.
Core Principle of DEX: AMM
Many DEXs operate using an AMM (Automated Market Maker) model.
Traditional exchanges use an order book.
In other words, trades happen by matching the orders of people who want to buy with those of people who want to sell.
However, in the AMM model, there is no order book.
Instead, the price changes automatically based on the amounts of the two assets in the pool.
A representative formula is:
Copied!x * y = k
Copied!(amount of ETH in DEX ) * ( amount of tokens in DEX ) = k
Where:
- x: the amount of ETH in the pool
- y: the amount of tokens in the pool
- k: a value that is kept constant
This means that when a large amount of one asset is removed from the pool, that asset becomes more scarce, and its price is automatically adjusted upward.
Example
Let us assume that there are 1,000,000 ETH and 1,000,000 tokens in the pool.
If we plug these values into the pricing formula and ask for the price of 1,000 ETH, the result is almost a 1:1 ratio.
If you swap 1,000 ETH, you would receive about 996 tokens.
If the fee is 0.3%, then under ideal conditions you would expect to receive 997 tokens.
However, because the pool ratio shifts slightly during the trade, a small amount of slippage occurs.
Let us look at another case more closely.
Suppose the pool has 5,000,000 ETH but only 1,000,000 tokens.
Then, if you swap 1,000 tokens, you would receive about 5,000 ETH.
Finally, imagine a case where the ratio is the same, but instead of swapping 1,000 tokens, you swap 100,000 tokens.
In this case, the amount of slippage becomes much larger.
Instead of receiving 498,000 ETH, you would receive only 453,305 ETH, because the trade significantly changes the balance of the pool.
At first, the pool may seem to have an almost 1:1 ratio.
However, if someone deposits ETH and buys a large amount of BAL, the amount of BAL in the pool decreases.
As BAL becomes more scarce, the next person who deposits the same amount of ETH will receive fewer BAL than before.
In other words, the price is not fixed; it changes automatically as trades occur.
What Does “Price” Mean Here?
In this context, price does not simply mean an externally fixed number such as
“1 ETH = some number of BAL.”
Rather, it means:
how much output you receive when you put in a certain amount of input.
So in a DEX, price can be understood as questions like:
If I put in 1,000 BAL, how much ETH will I receive?
If I put in 1,000 ETH, how many BAL will I receive?
Why Do Fees, Slippage, and Liquidity Matter?
A DEX usually charges a trading fee. For example, Uniswap-style systems commonly use a 0.3% fee.
Besides the fee, traders may also experience slippage. Slippage means that the actual amount you receive can be slightly lower than expected because the balance of assets in the pool changes during the trade. For example, even if the formula suggests that swapping 1,000 ETH should return about 997 BAL, the actual result might be closer to 996 BAL.
Slippage becomes larger when the trade size is large, when the pool has low liquidity, or when the two assets in the pool are not well balanced. In general, the larger and more balanced the pool is, the smaller the slippage will be.
This is why liquidity is so important in a DEX. For the exchange to work smoothly, the pool must contain enough assets for users to trade against. These assets are provided by liquidity providers (LPs), who deposit two assets, such as ETH and BAL, into the pool in a certain ratio. In return, they earn a share of the trading fees.
A simple way to understand this is: a trader swaps tokens, while a liquidity provider supplies the assets that make those swaps possible.
For example, in a balanced pool, a small trade can usually be executed with little slippage. However, a very large trade can significantly change the pool balance, leading to a much worse price. This means that even in the same pool, swapping 1,000 tokens and swapping 100,000 tokens can produce very different outcomes. In short, the larger the trade, the greater its impact on the price.
Advantages of DEX
A DEX has the following advantages:
- users can trade directly without an intermediary
- users keep control of their own assets in their own wallets
- the trading process is transparent because it is based on smart contracts
- many DEX projects are open source, so they are good for studying and understanding the structure
- they can be easily connected to a wide variety of tokens and DeFi services
In other words, a DEX can be understood as a way of trading directly on the blockchain while keeping full control over your own assets.
Limitations and Risks of DEX
However, DEXs are not always easy or safe to use.
- They can be difficult to use
For beginners, concepts such as wallet connection, token approval, gas fees, and slippage settings can be complicated.
- Gas fees are required
In Ethereum-based DEXs, users must pay gas fees, which are network fees charged for every transaction.
- Smart contract vulnerabilities may exist
If there is a bug in the code or a flaw in the design, users may suffer asset losses.
- Unverified tokens can be risky
Since anyone can create a token, there is always a risk of fraudulent projects or rug pulls.
- Impermanent loss can occur
Liquidity providers may end up with less value compared to simply holding their assets.
This is a typical risk that occurs when the prices of the two assets in the pool change significantly.
Deeper Understanding: Sandwich Attacks and MEV
Since DEXs operate on a blockchain, transactions are visible in the mempool for a short time before they are included in a block.
At that moment, a malicious participant can observe your transaction,
place a trade right before yours,
and then place the opposite trade immediately after yours in order to make a profit.
This is called a sandwich attack.
To explain it simply:
- I submit a transaction to buy a token with ETH
- someone else buys the same token first and pushes the price up
- my transaction is executed at a worse price
- that person immediately sells the token back and takes the profit
This is one of the representative examples of MEV (Maximal Extractable Value).
Then How Can This Be Prevented?
The simplest method is to include a condition such as:
“I must receive at least this minimum amount.”
In other words, if the actual outcome becomes much worse than the quoted price, the transaction should fail.
However, if this rule is applied too strictly, the transaction may be canceled entirely when another user’s transaction is executed first in the same block.
That is why real DEXs usually use the following approach:
allow a small amount of slippage, but cancel the transaction if the result becomes too unfavorable.
This is why users are usually asked to set a slippage tolerance.
Conclusion
In this practice, we explored both a dice game dApp and a decentralized exchange (DEX). Through these two examples, we saw that a dApp is an application whose main logic is executed by smart contracts on a decentralized network rather than by a centralized server.
We also learned that implementing randomness in a decentralized environment is not straightforward. Because blockchain systems are transparent and deterministic by nature, generating fair and unpredictable randomness requires additional design considerations.
In the DEX example, we studied how trading can be performed through an AMM-based mechanism without using a traditional order book. At the same time, we discussed important limitations of this model, such as slippage and impermanent loss.
Overall, this session helped us understand both the possibilities and the practical challenges of decentralized applications. In the May practice session, the next goal is to go one step further by exploring how dApps can be combined with AI to build more advanced blockchain applications.