Seungmin Kim([email protected])
Overview
In this session, we will continue working in the Ethereum testnet environment that was connected in the previous class. Using Remix IDE, we will practice deploying smart contracts directly to the blockchain and observe how token contracts operate in practice.
The session will cover the following topics:
- Deploying a token smart contract with Remix IDE
0. Smart Contracts
One of the most important features of Ethereum is that it goes beyond simply transferring cryptocurrency. It allows users to write their own rules in code and execute them on the blockchain.
This kind of code is called a smart contract. A smart contract is a program that defines specific conditions and actions. Once it is deployed on the blockchain, the rules are executed in the same way for everyone, and anyone can verify the result.
Because a smart contract is a program that runs on the blockchain, it can do much more than simple payments. It can be used to create and transfer tokens, record votes transparently, manage game items as blockchain assets, automate transactions when certain conditions are met, and issue digital records such as membership points, attendance proofs, or certificates.
In other words, a smart contract is not just a tool for “sending coins.” It is a way to encode rules that normally require trust between people and let the blockchain enforce those rules automatically.
A useful way to understand this is through a simple rental example. Suppose a person wants to rent a house. Instead of relying only on a middleman, the agreement could be encoded in a smart contract. The renter sends payment to the contract, and the seller is expected to provide the digital key by the agreed time. If the key is delivered correctly, the contract releases the payment. If the key is not delivered on time, the contract automatically refunds the renter. This is why smart contracts are often described as operating on an if–then logic: if a condition is satisfied, then the programmed action is executed automatically.
This programmable structure gives smart contracts several advantages. They can increase speed by automating processes that would otherwise require manual paperwork. They can reduce cost by removing intermediaries such as brokers, lawyers, or notaries in some cases. They can also improve trust, transparency, and accuracy, because the contract is stored on a shared ledger, executed automatically, and less dependent on human handling. In addition, blockchain-based records are backed up across the network and protected through cryptographic mechanisms.
Because of these properties, smart contracts are being explored in many application areas. In real estate, they can simplify rental or property-related processes. In healthcare, they can help manage access to medical records or proof of treatment. In the music industry, they can support automatic royalty distribution. In supply chains, they can improve traceability and automate approvals and payments.
At the same time, smart contracts also have limitations. Since they are still software, bugs in the code can cause serious problems. Also, real-world situations are often more complicated than simple code conditions. For example, even if a contract executes correctly on-chain, there may still be off-chain disputes or legal issues that the code itself cannot fully handle. Questions of regulation, taxation, and legal interpretation are also still evolving. So while smart contracts are powerful, they are not a perfect solution to every type of agreement.
Overall, smart contracts are one of Ethereum’s most important innovations because they allow rules, agreements, and digital interactions to be executed automatically on the blockchain without depending entirely on centralized intermediaries.

Difference Between EOAs and Contract Accounts
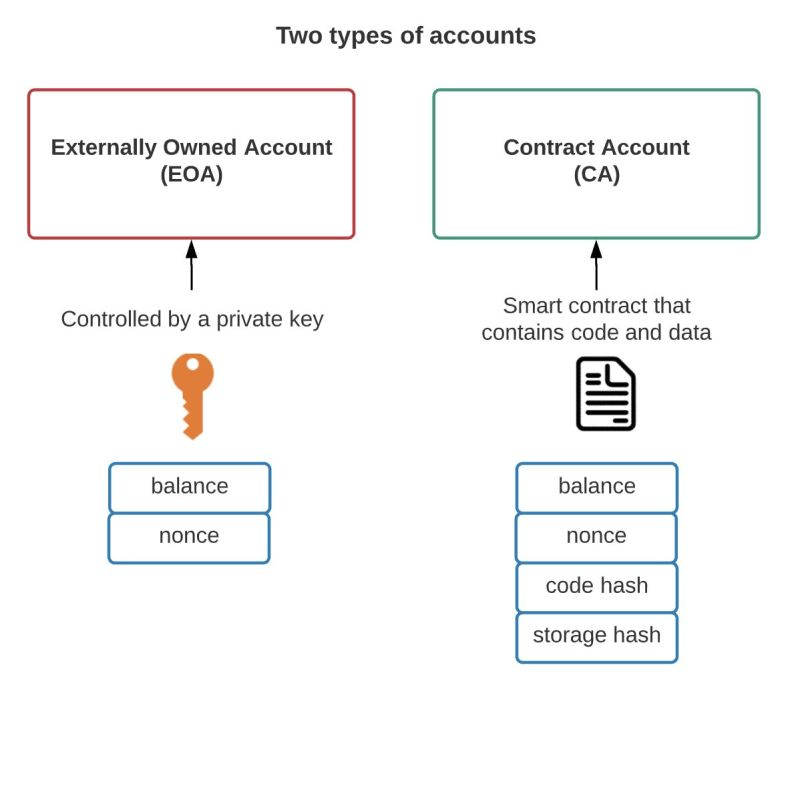
Ethereum has two main types of accounts: EOAs and contract accounts. An EOA, or Externally Owned Account, is a wallet account controlled by a user through a private key, such as a MetaMask wallet. It can sign transactions and initiate actions on the blockchain. A contract account, on the other hand, is created when a smart contract is deployed. It does not have its own private key and cannot initiate actions by itself. Instead, it only executes its code when it is triggered by an EOA or another smart contract. In this practice, your MetaMask wallet is an EOA, while the deployed token contract is a contract account. Understanding this distinction helps explain why your wallet can deploy a contract and call its functions, while the contract itself only reacts according to the code stored at its address.
Token Smart Contracts and Standards
Among these many possible applications, this practice focuses on token smart contracts, which are one of the easiest and most widely used examples to understand. Since a token can define its name, total supply, balances, and transfer rules in code, it is one of the most suitable examples for learning the concept of smart contracts.
A token is a digital unit on the blockchain that represents some form of value, right, asset, or record. For example, coins used like money, service access rights, points, voting rights, memberships, game items, and collectibles can all be represented in the form of tokens.
In fact, tokens can represent almost anything:
- Reputation scores on an online platform
- A game character’s abilities
- Financial assets such as company shares
- Fiat currencies such as USD
- One ounce of gold
- And much more
This is also why tokens are implemented through smart contracts. A token is not just a number; it requires rules such as who owns how much, how it can be transferred, and what the total supply is. By putting these rules into a smart contract, tokens can be issued and transferred on the blockchain in a consistent way without relying on a central server or administrator.
Since tokens are implemented through smart contracts, common rules are needed so that different applications can understand and use them consistently.
These common rules are called token standards.
What Is ERC-20?
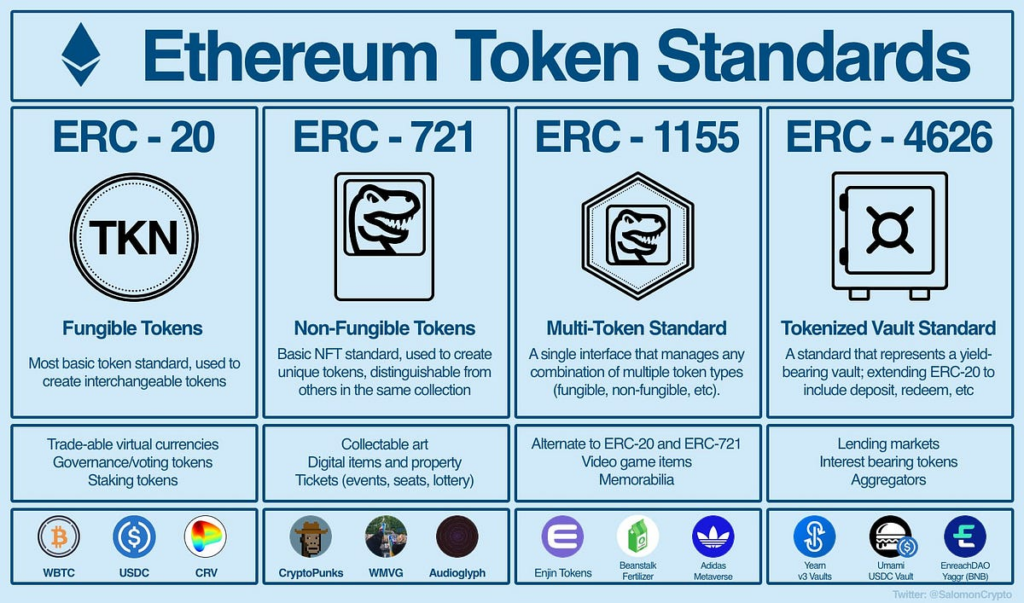
Ethereum defines standard interfaces so that tokens can work compatibly across the ecosystem. Two representative examples are ERC-20 and ERC-721.
ERC stands for Ethereum Request for Comments. It can be understood as a set of rules that allows smart contracts in the Ethereum ecosystem to interact in a common and compatible way. In other words, it defines the minimum functions and events that a token contract should include so that wallets, exchanges, and dApps can recognize and use it consistently.
Among these standards, ERC-20 is the standard for fungible tokens. Fungible means that each token has the same value and properties as another token of the same type, so individual units are interchangeable. For example, one ERC-20 token in a wallet is essentially treated the same as any other ERC-20 token of the same kind. This is similar to how one 1,000-won bill has the same value as another 1,000-won bill.
In contrast, ERC-721 is the standard for non-fungible tokens (NFTs). In this case, each token has unique information and cannot be exchanged on a one-to-one equivalent basis.
For token practice, it is appropriate to deploy a simple token contract that follows the ERC-20 standard. ERC-20 is one of the most widely used token standards on Ethereum and provides basic functions such as checking balances, transferring tokens, and granting approval.
In this practice, we will begin by deploying a simple token contract to understand how tokens are defined and used on Ethereum.
ERC20 sample:
https://github.com/OpenZeppelin/openzeppelin-contracts/blob/master/contracts/token/ERC20/ERC20.sol
ERC721 sample:
https://github.com/OpenZeppelin/openzeppelin-contracts/blob/master/contracts/token/ERC721/ERC721.sol
1. Remix IDE
Remix IDE
In this practice, we will use Remix IDE. Remix IDE is an Ethereum development environment that runs directly in the browser, allowing users to write Solidity smart contracts, compile them, deploy them, and call their functions all in one place. Since it can be used without any complicated installation process, it is well suited for introductory classes.
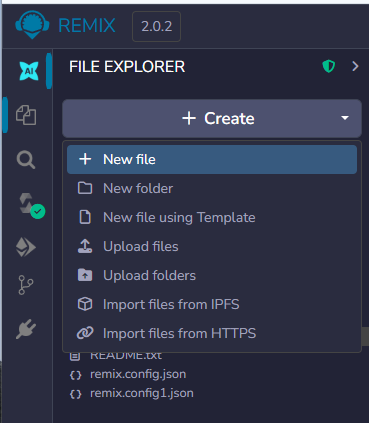
1. Create a New Solidity File
Click the File Explorer icon on the left side of Remix IDE.
Under the contracts folder, create a new file and save it with the name:
Copied!MyToken.sol
The .sol extension indicates that this is a Solidity source file for an Ethereum smart contract.

Simplified Token Contract
In this practice, we use a simplified token contract instead of a full ERC-20 implementation.
The goal is to make the exercise easier and focus only on the core ideas of a token, such as total supply, balances, transfer, and the mint function.
Copied!// SPDX-License-Identifier: MIT pragma solidity ^0.8.20; contract MyToken { string public name = "MyToken"; string public symbol = "MTK"; uint8 public decimals = 0; uint256 public totalSupply; mapping(address => uint256) public balanceOf; event Transfer(address indexed from, address indexed to, uint256 value); constructor(uint256 initialSupply) { totalSupply = initialSupply; balanceOf[msg.sender] = initialSupply; emit Transfer(address(0), msg.sender, initialSupply); } function transfer(address to, uint256 value) public returns (bool) { require(balanceOf[msg.sender] >= value, "Not enough balance"); require(to != address(0), "Invalid address"); balanceOf[msg.sender] -= value; balanceOf[to] += value; emit Transfer(msg.sender, to, value); return true; } function mint(address to, uint256 value) public returns (bool) { require(to != address(0), "Invalid address"); totalSupply += value; balanceOf[to] += value; emit Transfer(address(0), to, value); return true; } }
Token Name and Symbol
Copied!string public name = "MyToken";
string public symbol = "MTK";
This part defines the token’s name and symbol.
- name: the full name of the token
- symbol: the abbreviated name of the token
These values can be changed freely.
Decimal Places
Copied!uint8 public decimals = 0;
This variable defines how many decimal places the token uses.
In other words, it determines whether the token can be divided into smaller units.
For example:
- If
decimals = 0, the token cannot be divided into fractional units, so sending10means sending exactly 10 tokens. - If
decimals = 18, the token can be divided into very small units, and values are interpreted with 18 decimal places, similar to ETH.
In many ERC-20 tokens, the value 18 is commonly used for decimals. However, for an introductory practice session, setting it to 0 is more intuitive.
Total Supply
Copied!uint256 public totalSupply;
This variable stores the total number of tokens that have been issued.
For example, if 1000 is entered at the time of deployment:
- Total supply = 1000
- At the beginning, all 1000 tokens are assigned to the deployer
Balance Storage Structure
Copied!mapping(address => uint256) public balanceOf;
This part defines the structure that stores how many tokens each address owns.
Put simply, it can be understood as a table in the form of:
address → balance
For example:
- Address A: 1000 tokens
- Address B: 0 tokens
In this way, the number of tokens owned by each account is recorded.
Event Declaration
Copied!event Transfer(address indexed from, address indexed to, uint256 value);
An event is a log used to leave a record on the blockchain.
Whenever tokens are transferred, it records:
- who sent them,
- who received them,
- and how many were sent.
In other words, the Transfer event makes it possible to track token movements from outside the contract.
Constructor
Copied!constructor(uint256 initialSupply) {
totalSupply = initialSupply;
balanceOf[msg.sender] = totalSupply;
emit Transfer(address(0), msg.sender, totalSupply);
}
This part is executed only once, when the contract is first deployed.
Its roles are as follows:
- It stores the
initialSupplyvalue entered at deployment as the total supply. - It assigns all of that amount to the deployer (
msg.sender). - It records the initial issuance as an event.
For example, if 1000 is entered during deployment:
totalSupply = 1000- the deployer’s balance =
1000
becomes the initial state.
Token Transfer Function
Copied!function transfer(address to, uint256 value) public returns (bool) { require(balanceOf[msg.sender] >= value, "Not enough balance"); require(to != address(0), "Invalid address"); balanceOf[msg.sender] -= value; balanceOf[to] += value; emit Transfer(msg.sender, to, value); return true; }
This function is used to send tokens to another address.
Its operation proceeds in the following order:
- It checks whether the sender has a sufficient balance.
- It checks whether the recipient address is valid.
- It decreases the sender’s balance.
- It increases the recipient’s balance.
- It records the transfer event.
- It returns whether the transfer was successful.
When this function is executed, the ownership of the tokens is updated.
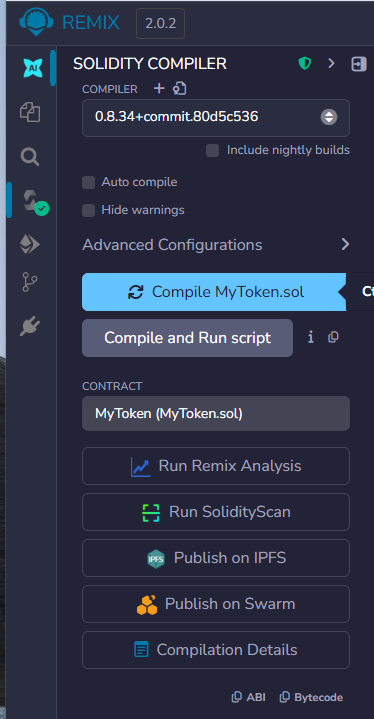
2. Compile the Contract
Click Solidity Compiler on the left side of Remix IDE.
Then:
- Set the compiler version to 0.8.20 or a compatible version
- Click Compile MyToken.sol
If there are no errors, the compilation has succeeded.
You can confirm this when a green check mark appears in the compiler tab.
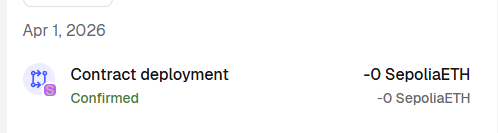
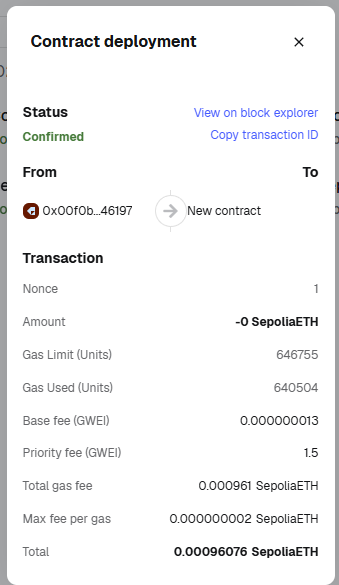
3. Deploy
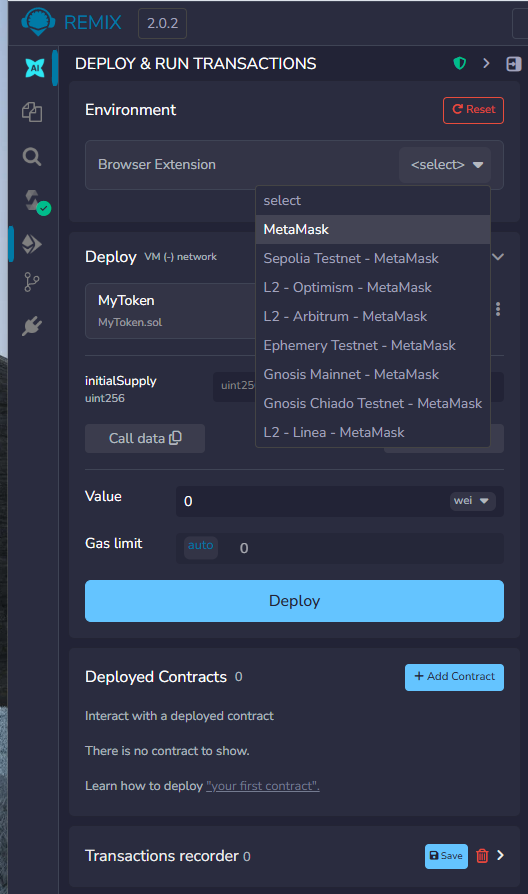
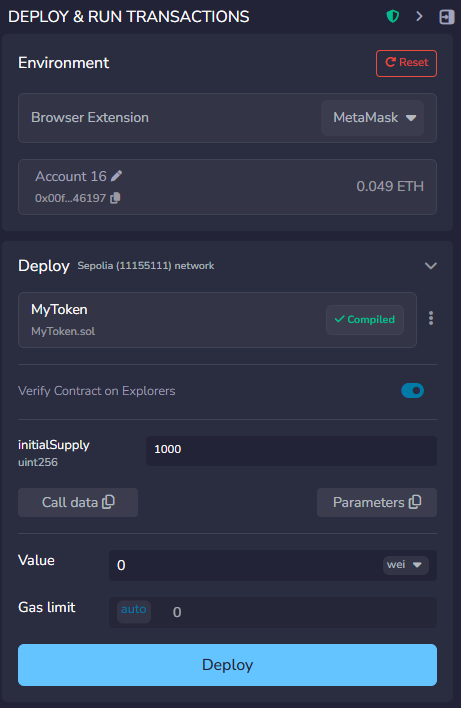
Click Deploy & Run Transactions on the left side of Remix IDE.
Then set the Environment to:
Injected Provider – MetaMask
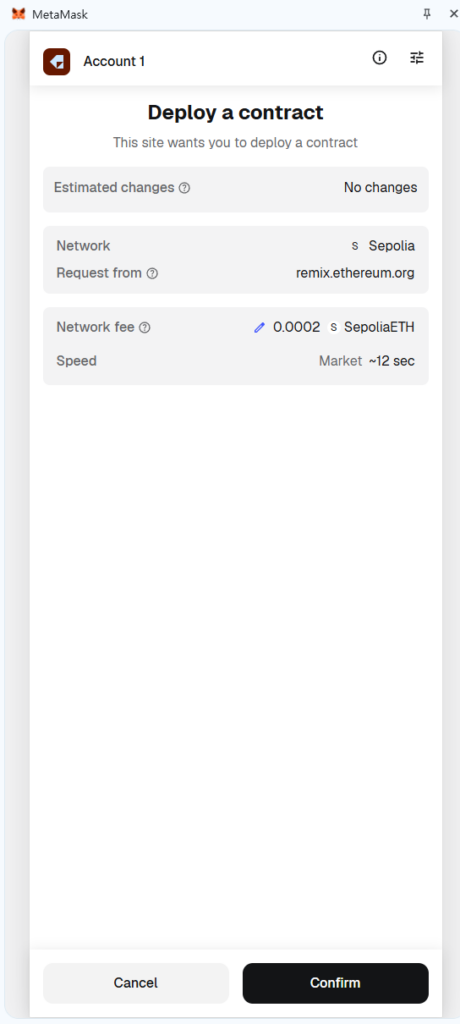
This option connects Remix IDE to your MetaMask wallet, allowing the contract to be deployed to the Sepolia test network.
After selecting it, MetaMask may open and ask for permission to connect. Approve the connection, and make sure that MetaMask is currently connected to Sepolia.
Enter the Constructor Value
When deploying the contract, you need to enter the initialSupply value.
For example, if you enter:
Copied!1000
then 1000 MTK will be issued to the account that deploys the contract.
After that, click Deploy.
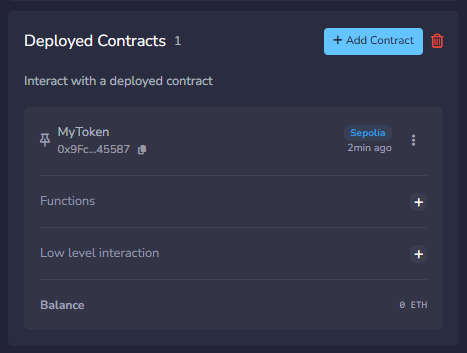
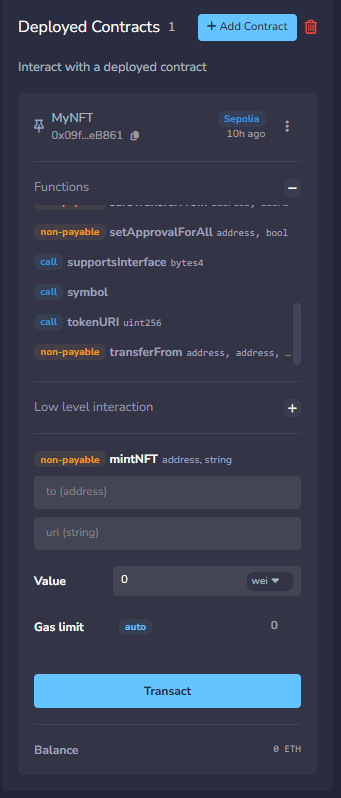
5. Check the Deployed Contract
Under Deployed Contracts, you will see MyToken.
The first functions to try are:
namesymboltotalSupplybalanceOf
For balanceOf, you need to enter an address.
If you are connected through MetaMask, copy your current wallet address from MetaMask and paste it into balanceOf.
This allows you to check how many tokens are currently assigned to that address.
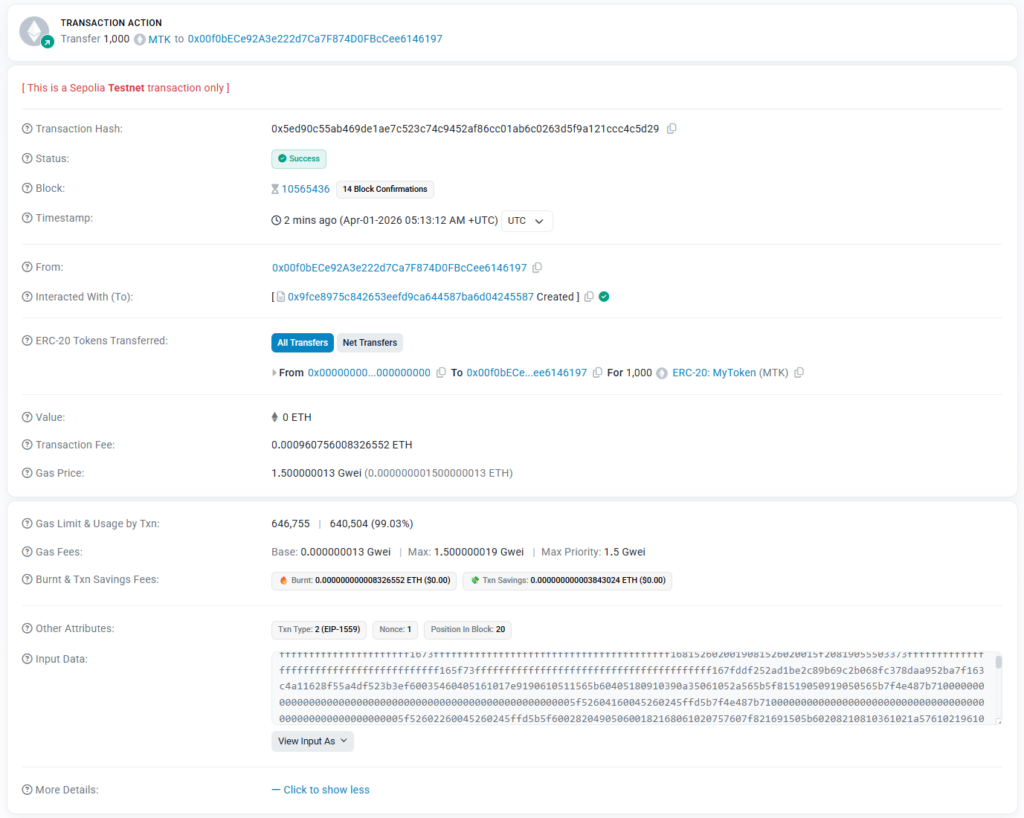
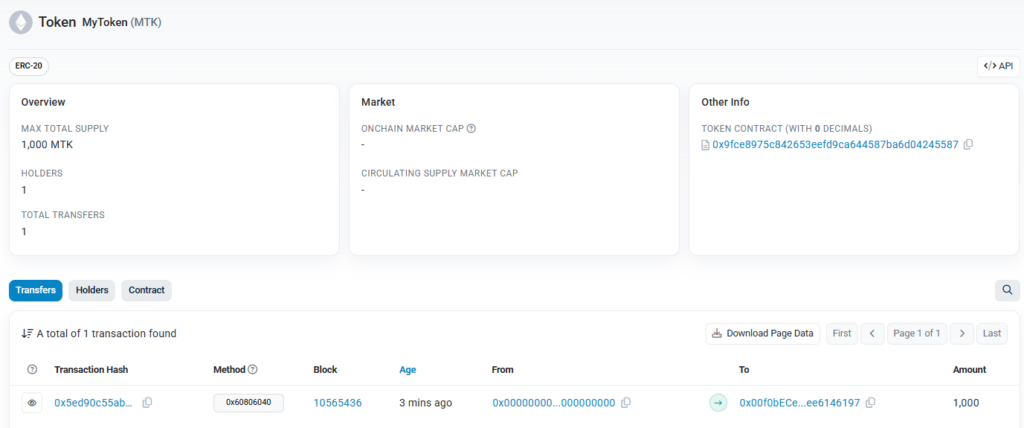
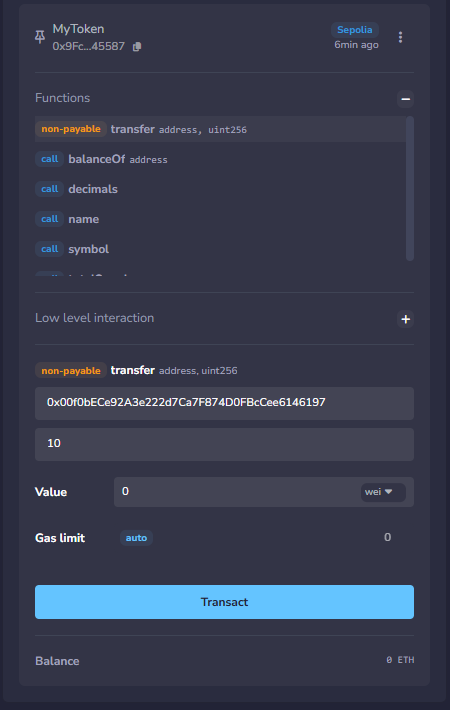
6. Try Transferring Tokens
Now you can execute the transfer function.
How to use it:
- to: enter another wallet address
- value: enter the number of tokens to send
Since decimals = 0 in this contract, the value is interpreted as the exact number of tokens.
For example:
-
10= 10 tokens -
100= 100 tokens
Choose one wallet address at random from the Google Sheet below and send some tokens to that address:
https://docs.google.com/spreadsheets/d/1eeemHdtuIXhlU7gCy443pjE-sNkCufb9PubZs0iMtZA/edit?usp=sharing
After the transaction is confirmed, you can check whether the recipient’s balance has increased.
Difference Between Reading (Call) and Writing (Transaction)
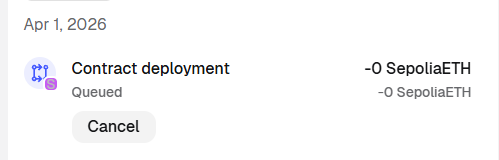
When interacting with a smart contract, it is important to distinguish between reading data and writing data. A call is used to read information from the blockchain without changing the contract’s state. For example, functions such as name, symbol, totalSupply, or balanceOf simply return stored data, so they do not require gas fees or wallet confirmation. In contrast, a transaction is used when an action changes the blockchain state. Functions such as transfer, mint, or contract deployment update stored values on-chain, so they require the user to sign the action with a wallet such as MetaMask and pay gas fees. In other words, a call is for viewing data, while a transaction is for changing data. Understanding this difference helps explain why some contract interactions return results immediately, while others open MetaMask and must wait for block confirmation.
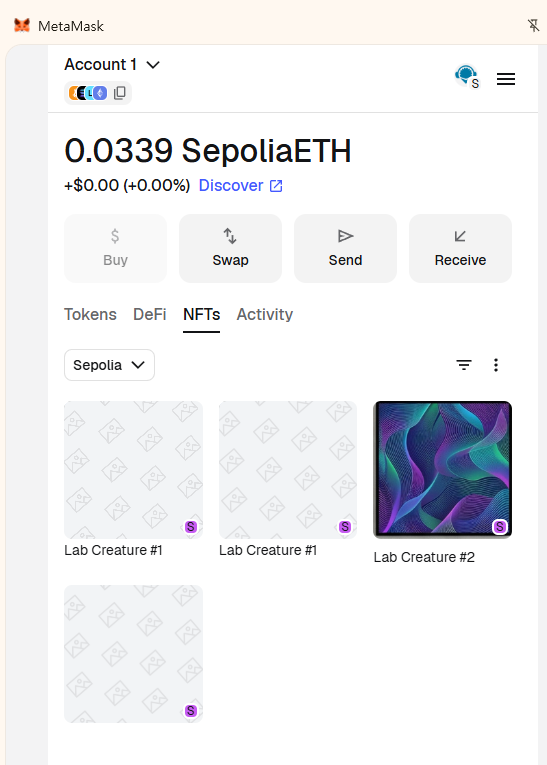
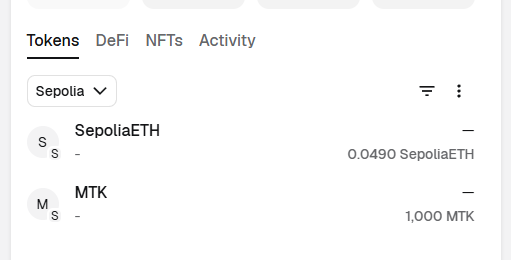
Adding a Token to MetaMask
After deploying a smart contract, you can add the token to MetaMask as a custom token so that you can view it directly in your wallet.
This step uses the token contract address to make the token you deployed appear in the MetaMask wallet interface.
Once the token is added to MetaMask, you can check the following:
- The number of tokens you own
- The token name and symbol
- Changes in balance when you receive tokens from other users
In other words, token information that you previously checked only in Remix IDE can now also be viewed through the actual wallet interface.
How to Add the Token
- Open MetaMask.
- Click Import Tokens.
- Select Custom Token.
- Enter the contract address of the token you deployed.
- In most cases, the token symbol and decimals will be filled in automatically.
- Click Add Custom Token, then click Import Tokens again to complete the process.
If the token is added successfully, you will be able to check its balance in MetaMask.

This time, record and share the contract address of the token you deployed in the Google Sheet below.https://docs.google.com/spreadsheets/d/1eeemHdtuIXhlU7gCy443pjE-sNkCufb9PubZs0iMtZA/edit?usp=sharing
7. Loading Another Person’s Token Contract and Trying the mint Function
The current contract contains a vulnerability in its mint function.
Because this function does not restrict who can call it, any user can mint new tokens.
In this step, instead of using a contract that you deployed yourself, you will load another person’s token contract address shared in the Google Sheet into Remix IDE and directly execute the mint function.
The purpose of this exercise is to demonstrate how dangerous a mint function without proper access control can be.
If a token contract does not restrict access to its mint function, then even someone other than the deployer can create any amount of tokens for any address.
How to do it
- Choose one token contract address deployed by another person from the Google Sheet below:
https://docs.google.com/spreadsheets/d/1eeemHdtuIXhlU7gCy443pjE-sNkCufb9PubZs0iMtZA/edit?usp=sharing - In Remix IDE, go to the Deployed Contracts section and click Add Contract.
- Enter the token contract address copied from the sheet.
Once added, the contract instance will appear in the Deployed Contracts list, and you will be able to call its functions directly. - Find the
mint(address to, uint256 value)function in the loaded contract. - In the
tofield, enter your own MetaMask address. - In the
valuefield, enter the number of tokens to mint.
For example, entering 500 means attempting to mint 500 tokens. - Click the
mintbutton and approve the transaction in MetaMask.
If the transaction succeeds, this means that another person was able to create tokens freely using someone else’s contract.
This demonstrates why proper access control is essential in smart contracts.
Without it, anyone can mint tokens at will, which breaks the scarcity and trustworthiness of the token.

8. Fixing the Token Vulnerability
The code below is the fixed version of the contract, which resolves the vulnerability in the previous mint function by adding proper access control.
Copied!// SPDX-License-Identifier: MIT pragma solidity ^0.8.20; contract MyToken { string public name = "MyToken"; string public symbol = "MTK"; uint8 public decimals = 0; uint256 public totalSupply; address public owner; mapping(address => uint256) public balanceOf; event Transfer(address indexed from, address indexed to, uint256 value); modifier onlyOwner() { require(msg.sender == owner, "Not owner"); _; } constructor(uint256 initialSupply) { owner = msg.sender; totalSupply = initialSupply; balanceOf[msg.sender] = initialSupply; emit Transfer(address(0), msg.sender, initialSupply); } function transfer(address to, uint256 value) public returns (bool) { require(balanceOf[msg.sender] >= value, "Not enough balance"); require(to != address(0), "Invalid address"); balanceOf[msg.sender] -= value; balanceOf[to] += value; emit Transfer(msg.sender, to, value); return true; } function mint(address to, uint256 value) public onlyOwner returns (bool) { require(to != address(0), "Invalid address"); totalSupply += value; balanceOf[to] += value; emit Transfer(address(0), to, value); return true; } }
This contract fixes the vulnerability by restricting access to the mint function.
The following parts were changed:
1. The owner variable was added
Copied!address public owner;
This variable stores the address of the contract owner, which is the account that deploys the contract.
2. The onlyOwner modifier was added
Copied!modifier onlyOwner() {
require(msg.sender == owner, "Not owner");
_;
}
This modifier checks whether the caller is the owner.
If the caller is not the owner, the function execution is reverted.
3. The constructor now assigns the deployer as the owner
Copied!owner = msg.sender;
This means that the account that deploys the contract becomes the administrator of the token contract.
4. The mint function is now protected
Before:
Copied!function mint(address to, uint256 value) public returns (bool)
After:
Copied!function mint(address to, uint256 value) public onlyOwner returns (bool)
This is the key security fix.
Now, only the owner can call mint, and other users can no longer create tokens arbitrarily.
In the vulnerable version, anyone could mint tokens freely, which broke the scarcity and trustworthiness of the token.
In the fixed version, minting authority is restricted to the contract owner, making the contract much safer.
Next step
Now, deploy this fixed contract yourself using Remix IDE.
After deployment:
- copy the contract address,
- open the Google Sheet below,
- and add your deployed contract address to the sheet.
https://docs.google.com/spreadsheets/d/1eeemHdtuIXhlU7gCy443pjE-sNkCufb9PubZs0iMtZA/edit?usp=sharing
By sharing the contract address, other students can load your fixed token contract and compare it with the vulnerable version.
NFT and ERC-721
What is NFT?

An NFT, or Non-Fungible Token, is a unique digital token recorded on a blockchain. Unlike cryptocurrencies such as Bitcoin or Ether, which are interchangeable and have the same value as one another, each NFT is distinct and cannot be replaced by another identical token.
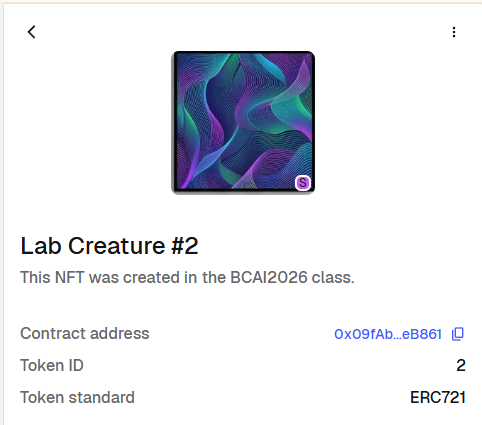
NFTs are commonly used to represent ownership of digital items such as images, collectibles, music, game assets, or certificates. In practice, an NFT usually stores ownership information and a link to metadata, which may include the name, description, image, and other properties of the digital item.
NFT Contract: ERC721
ERC-721 is the standard smart contract interface for NFTs on Ethereum. It defines how a non-fungible token should represent ownership, transfer, approvals, and metadata so that wallets, marketplaces, and blockchain explorers can recognize and interact with it in a consistent way. Unlike fungible tokens such as ERC-20, where every token is interchangeable, each ERC-721 token is unique and can represent a distinct digital asset such as artwork, collectibles, certificates, or game items. The standard also supports metadata through functions such as name, symbol, and tokenURI, which allow an NFT to be displayed with its title, description, image, and other properties.
We use ERC-721 in this practice because it is the most widely recognized NFT standard and provides the clearest structure for understanding how NFTs work. By using an ERC-721 contract, students can observe the core elements of an NFT system in a standard form: unique token IDs, ownership tracking, minting, transfer, and metadata linkage through tokenURI.
ERC721 Sample:
Why do NFTs use metadata?
NFTs use metadata because storing all asset information directly on the blockchain would be expensive and inefficient. In ERC-721, the metadata extension provides tokenURI, which can point to a JSON file that follows the ERC-721 Metadata JSON Schema. That schema includes fields such as name, description, and image, allowing the blockchain to keep the token and ownership data on-chain while linking richer asset information externally.
Metadata is also important because it makes NFTs understandable to people. Without metadata, an application may only know that a certain wallet owns token ID 3. With metadata, wallets, marketplaces, and explorers can display a readable title, description, image, and additional properties of the asset. This is why NFT platforms commonly fetch a JSON metadata file from the tokenURI and then use it to render the NFT in a user-friendly form.
Metadata also improves interoperability. Because ERC-721 defines a standard interface and a standard way to expose asset information through tokenURI, different applications can read and display the same NFT in a similar way. In other words, metadata helps one NFT work across multiple wallets, marketplaces, and blockchain tools without requiring each service to invent its own custom format.
Finally, metadata gives NFTs flexibility. ERC-721 was designed for many kinds of unique assets, including digital items, collectibles, and even physical property. Since different assets may need different descriptions, media, or attributes, linking metadata through a URI makes the NFT model much more adaptable than storing only a bare token ID on-chain.
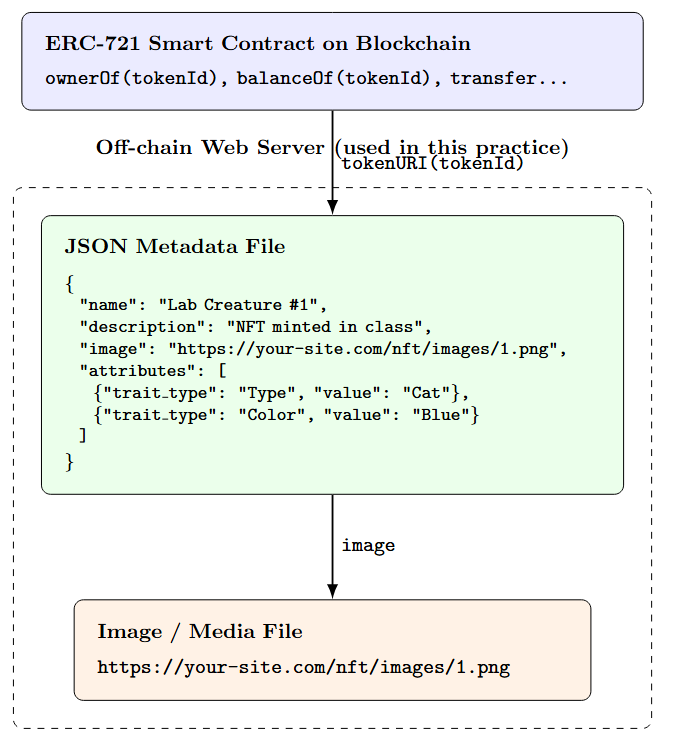
The figure illustrates the basic structure of an NFT system based on ERC-721 metadata. The smart contract on the blockchain mainly stores ownership and token-related information, such as ownerOf(tokenId) and transfer functions. When an application queries tokenURI(tokenId), it receives a URI pointing to a JSON metadata file. That JSON file contains human-readable information such as the NFT’s name, description, image link, and optional attributes. The image or media file is then loaded from the location specified in the metadata.
Strictly speaking, ERC-721 itself is not “made of a JSON file and an image.” Rather, the ERC-721 metadata extension allows the token to reference a JSON metadata document, and that document can in turn reference an image or other media resource. Thus, the blockchain stores the NFT’s identity and ownership, while the metadata and media are typically stored off-chain. In real-world deployments, this off-chain data is often stored using IPFS, but in this practice we use a regular web server for simplicity and easier demonstration.
IPFS
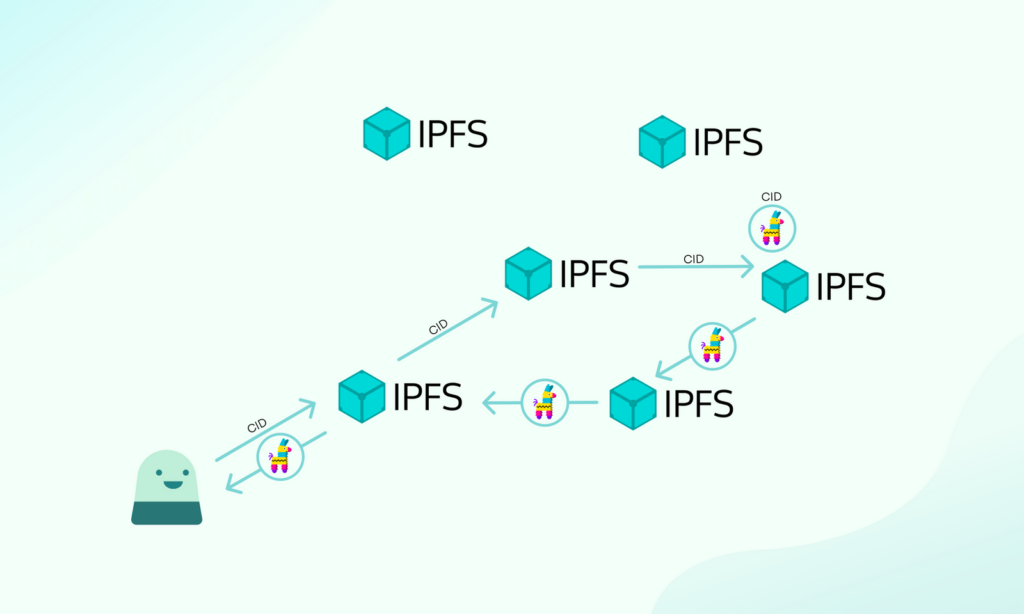
IPFS, or the InterPlanetary File System, is a distributed file storage system that is often used in NFT projects to store metadata and media files in a more decentralized way. Instead of relying on a single web server, IPFS allows files to be accessed through content-based addressing, which makes it more suitable for preserving NFT-related resources over time. In many real NFT deployments, the JSON metadata file and the associated image are stored on IPFS, and the NFT contract refers to them through URIs.
In this practice, however, we do not use IPFS. Instead, we use a regular web server to host the JSON metadata files and image files, since this makes the structure easier to prepare, manage, and understand in a classroom environment.
Students who want to try the IPFS-based approach may refer to the NFT section of last year’s smart contract materials, where the process of storing NFT metadata and media with IPFS is introduced in more detail.
Worldland Programming- Smart Contract – II – INFONET
NFT Contract
NFT Contract Code
This contract is written by inheriting from ERC721URIStorage. Inheritance is a way for a child contract to reuse the functionality of an already implemented parent contract. In other words, when we write MyNFT is ERC721URIStorage, MyNFT does not need to reimplement all of the basic functions required by the ERC-721 NFT standard from scratch. Instead, we can simply build our own minting logic on top of it. OpenZeppelin’s ERC-721 implementation already provides the core functions such as ownerOf, balanceOf, transferFrom, safeTransferFrom, name, symbol, and tokenURI, while ERC721URIStorage is an extension of ERC-721 that allows each token to store its own metadata URI more flexibly.
OpenZeppelin is a widely used collection of reusable and modular smart contract libraries for Ethereum and other EVM-based blockchain development. It provides commonly needed features such as token standards, access control, and utilities in a safe and well-tested form. Because of this, developers can build contracts more easily by importing and combining the functions they need, rather than reimplementing complex standards themselves.
- Create a new file in Remix and name it:
Copied!MyNFT.sol
2. Then paste the following code.
Copied!// SPDX-License-Identifier: MIT pragma solidity ^0.8.24; import "@openzeppelin/contracts/token/ERC721/extensions/ERC721URIStorage.sol"; contract MyNFT is ERC721URIStorage { uint256 private nextTokenId; constructor(string memory name_, string memory symbol_) ERC721(name_, symbol_) Array function mintNFT(address to, string memory uri) public returns (uint256) { uint256 tokenId = nextTokenId; nextTokenId += 1; _safeMint(to, tokenId); _setTokenURI(tokenId, uri); return tokenId; } }
Example of minting
When calling mintNFT(), each student should enter:
-
to= their own wallet address -
uri= the metadata JSON file that matches their sheet number
In other words, students should replace # in the URL with their own assigned sheet number.
For example:
- If your sheet number is 1
https://raw.githubusercontent.com/smin-k/BCAI-NFT-2026-FILE/main/1.json - If your sheet number is 7
https://raw.githubusercontent.com/smin-k/BCAI-NFT-2026-FILE/main/7.json - If your sheet number is 15
https://raw.githubusercontent.com/smin-k/BCAI-NFT-2026-FILE/main/15.json
So, the input format is:
uri = https://raw.githubusercontent.com/smin-k/BCAI-NFT-2026-FILE/main/#.json
Here, # should be replaced with your own sheet number.
For example, if your number on the class sheet is 12, then you should enter:
https://raw.githubusercontent.com/smin-k/BCAI-NFT-2026-FILE/main/12.json
Then the contract will mint a new NFT and connect that token to your own metadata file.